Sunday, September 30, 2012

Theme and Variation

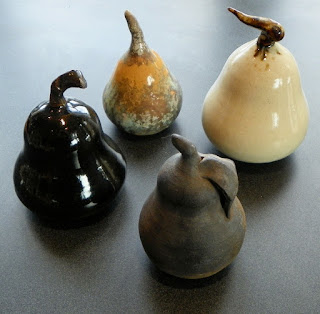
It's amazing how a surface can make the same thing look so different.


These pears were made to be purely decorative. 

Sometimes, I make these to use as salt and peppers. (However, salt and peppers have a totally  different interior construction.)


The white pear glaze is just pure white with an iron-based stem glaze that was encouraged to run.

The matt black was a smoke fired piece which feels wonderful in your hand.

And the shiny black was a glaze test for this delightful glaze.

The smallest pear is a multiple finish:  A basic white with a pumpkin glaze and touches of turquoise glaze. An oxide was applied and then an adhesive for random additions of gold foil.  (Sometimes it's good to go 'way out on a limb.)

It garnered a prize in a Seattle show.


I like pears so much, I even make velvet pincushions. 


Friday, September 28, 2012

Oops!

This just cracks me up.

wink wink nudge nudge

Click on the picture to get the gag.


Monday, September 24, 2012

The Almost-Final Kitchen Pictures


It was cloudy and gloomy out the other day. Just the kind of day to get good interior shots with all the LED lights on yet to also capture glimpses of the outdoors. So, I charged my camera up and took these shots of the kitchen.


I say Almost-Final because I haven't gotten shades up yet. I'm thinking Roman blinds (since they will be open most of the time) with broad black and white stripes. Pottery Barn has something that would almost work, but they don't make them wide enough.


Here are the shots going around the room from the sink that faces South. The cabinet on the far side of the refrigerator is a large pull-out pantry with steel basket shelves. I can store nearly all my canned goods in there plus the bottom section is for recycle and bag storage.

Behind that large cabinet unit is the old porch which is not a walk-in pantry.

I can't believe how much more room I've gained!


The basket collection comes from all over. Left to right:  Bamboo purse, backpack from the hill tribes of Bagio in the Philippines, apple picker back basket, another tiny backpack from unknown region, Filipino fish trap in the corner, pie basket from Missouri, an egg basket that I made, and a Mexican market basket. 


The two tall cabinets from Renovation Hardware and the "Guds Frid" sign has been remounted over the doorway. The cabinet on the left holds baking supplies, extra pans, booze and flower vases. 


The cabinet shown here holds serving dishes, everyday dishes, cookbooks and oversized serving pieces. 

I LOVE this commercial grade prep table. It works as an island, but is much more. It's movable on wheels. It's handy for hot foods from the oven, cold things from the fridge, for staging things out of the dishwasher, and as a buffet table. It's great to work on and cleans up beautifully. Great for storing oversized steel pans and items. 


The table in front of the windows provide great views of the bay. (Note the binoculars for ogling boats and birds, to say nothing of the occasional eagle, geese, great blue heron, or kingfisher.) We also see sea otters and seals lounging on the docks. My Currier and Ives sloop prints are perfect here. 

Knowing how you cook and use a kitchen helps tremendously in renovating a space. 

I now have everything centered at the back of the room leaving the front for the eating and enjoying the view, clearing a traffic lane for going in and out and creating a new relationship for the dishwasher/silverware/dish storage. ie. dishes come out of the dishwasher, got to the table, sorted. They are put away in the tall cabinet to the left, ready for the next table setting. The silverware is stored in the top drawer next to the dishwasher. This model dishwasher has a silverware sorting tray in the top, so the transfer from dishwasher to storage trays in the drawer is an absolute snap. 

Monday, September 17, 2012

Funny Little Pot


So here's a variation on two themes:  Surface treatment and the handbuilt pot.

I used a sea shell, a shred of some kind of plastic car-light part picked up in a parking lot, a wooden stamp, a piece of styrofoam packing and the end of a dowel.


The handbuilding was intentionally un-square.

It was okay to overlap the celadon glaze.


I have no idea what it could be used for.  But that's for the buyer to figure out.

Wednesday, September 5, 2012

How to put a Wine Glass on a Ray Gun


I made this Ray Gun........
It is porcelain with assembled wheel-thrown components, a hand made grip, fired to cone 6 with a clear glaze.

I added a piece of glass into the end. But somehow, it still just didn't have any punch.....

I thought about adding a cold glaze finish, but decided to wait because somehow, that wasn't the solution either.


So one day, I was cleaning out my wine storage cellar in the basement........


And I saw these disposable wine glasses. The cup halves were all stacked together, one inside the other and the bases were all snapped together. The cup part and the stem base pieces are supposed to join together to make a whole wine glass.

I kept thinking I liked the appearance of all the bases stuck together. They looked like something entirely different than wine glass bottoms.


I had another ray gun out in my studio in three pieces, waiting to be assembled.

This ray gun had been fired in three pieces because I wanted to experiment with adding other components.

I took the wine glass bases out to the studio.
I held the ray gun together in my hand and tried the bases in several configurations.

I liked the way the wine glass bases and the sectioned ray gun looked when it was all assembled.


I glued the whole ray gun together with Goop.
So next,I took the wine glass top pieces out to the studio.

I stuck one on the front of the first ray gun.
It looked great.

But how do you glue a wine glass to a ray gun so it looks 'finished'?.

First, I drew the outline of the cup. Then I squeezed glue onto the outline.
I put the lip of the cup over the glue to make a 'marriage' of the plastic cup and the porcelain flange.

I lined the flange with a continuous line of glue and placed the wine cup over the end of the ray gun.

I held it together.

For a long time.


It Worked!

Don't tell anybody it's a plastic wine glass, okay?