Sunday, August 19, 2012

A "Racer"

In every kiln firing, there is usually one piece that comes out better than you dreamed. Some people call them "Racers". 

Here's my racer.

This thing has been setting around on a shelf waiting to be fired for a long time. It's big. There hasn't been a firing that allowed a free shelf, so this piece got put off and putt off. 

But this guy made it into the OVERFIRE kiln. Yikes. All these glazes are supposed to be good up to cone 6. I don't know how hot the last kiln got because the thermocouple malfunctioned. The chances of duplication? almost nil.

I do know that this is celadon and iron applied over it.


It did blister a bit, but no explosions or craters. 

I just love it. It's a keeper.

Thursday, August 16, 2012

Egg Separator

One piece that survived the kiln overfire was a small egg separator.

It goes without saying that the inside  must be absolutely smooth.

My thinking is that this little thing might be handy to have in a kitchen drawer.

If you can crack an egg with one hand, you can hold it in the other hand.

Or it could sit over a glass, measuring cup, inside a small bowl.

I like it so much I think another is in order and maybe this time with a matching cup to go underneath.
The dome design would work well as a lid for an incense jar or a garlic keeper too.  Here it is sitting on a small flared bowl. I think lips and flanges are in order for a jar or keeper, though.


Monday, August 13, 2012

New Glazes Tiles

Doing glaze tests is a tedious thing....

I can see why people find one or two glazes they like and just do everything with those.

But that would be too easy......


Testing glazes means a lot of stirring, sieving, dipping, drying, labeling, shifting buckets around, making notations on my test record pages.

Some tests were about new glazes; some were just checking old ones that might have changed over time.

I used to make my tiles really small because I put a string through the hole in the top and tie the tile to the glaze bucket. If the glaze is in a jar, I fasten the tile to the side with a big piece of transparent package tape.

I also use a Sharpie to label the bucket or jar in big letters. Saves a lot of time when you're trying to hunt down a glaze.

Bigger tiles mean more room for notes. I use any underglaze to do this. Just a dot on a piece of paper or spare yogurt lid is fine and handy for the underglaze. I also like the fine limner brushes to do the lettering with.

So, I'm rather sloppy when it comes to making these. Speed is the thing here, not perfection......
----------Of course, just as soon as I wrote this and fired the kiln, the thing overfired. The thermocouple failed. Pots welded themselves to the shelves and the witness cones are beautiful,  pearly puddles. 

A trip to Clay Art Center is in order. New shelves, new thermocouple, and while I'm at it, some grinding stones. 

Pottery:  It teaches you how to deal with failure and move on.


ALL the time.


Wednesday, August 8, 2012

A Two Dimensional Interlude

Found while sorting visual reference files......

Drawn for the amusement of my children when they were in grade school.....
            Quote by V. Lindsay

Funny, the things you keep.


By the way,

    In real life,
         
          I hate grasshoppers.

Sunday, August 5, 2012

Neat-O

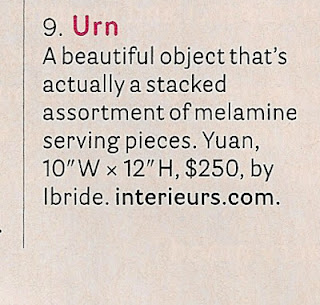
This urn just blew my mind.

It's made of plastic and has four plates, three bowls, and two small sauce dishes.

The whole thing masquerades as a jar.  It's so Clever!


I'd love to make one like it in clay, but I think it would be too heavy.

I love things like this.

A modification of this idea might work, though.


Tuesday, July 31, 2012

Clay Picture Frames


Sometimes, I like to combine clay and 2-dimensional work in a different way.

This clay frame was made before the drawing--I think it's easier that way.  It isn't a large frame, only 5" x 6". Another experiment in clay engineering.

I turned the corners up just for fun.

I experimented with a glaze at the same time.

The tree is an imaginary one done in watercolor.

Note:  the seemingly cracked corner is the result of an accidental collision of the frame and a teenager.


You can make a slot for the artwork in the back by applying strips of clay on 3 sides offset around the display window of the frame. Just look at the backs of some of the frames you have around the house and improvise.

This frame has a raised edge on 4 sides. The glass, picture and backing fit into the recess created by the edges, then the backing and the clay are held in place with, in this case, just tape.


Hanging can be solved in many ways also.

This piece hangs from an opening made in the clay at the top. A small nail fits right into the space left under the loop. The piece is quite small and doesn't weight much, so this works well.

You can make an indented hole area on the back of a frame to fit a hanger.

Loop holders for wire strung across the back is another way to solve the hanging problem. A lot of times, I've used fishing line or jewelry wire to hand pictures and claywork. These are strong wires.

A high temp kiln wire can serve as a holding wire. It can be embedded in the clay and fired at the same time in the kiln.

You are only limited by your imagination.


Sunday, July 29, 2012


One of my passions is collecting shells. Even though I don't live in Florida, where I understand people fill garages with them, I have accumulated a good selection.

They are my favorite subject for drawing. Beside that, I have often thought about putting my own  claywork in a drawing.

This is a little bowl that is long gone from my inventory, but at the time, it made a very good background for these small shells referred to as "Blood Mouths" because of their vividly red lips. The drawing is done in colored pencil on a light blue paper.

Blood-mouths* are often mistaken for cone shells, but they are really conch shells, common to Guam, where I collected these and first started diving.

*Strombus luhuanus.   Also known as the Blood-mouth Conch, this sea shell features a dark brown columellar and a reddish inner lip. This animal lives in colonies and is This seashell is common to Western Pacific on sand to 5 fathoms.   Measures approx 1. 5" - 2".  

Saturday, July 21, 2012

A Most Interesting Spout

I have this coffee pot. I've owned it for many years. It was part of a drip coffee set that has the pot on the bottom and a funnel-shaped porcelain filter holder that sits atop it. You insert a paper filter, fill it with grounds, pour hot water through the grounds and the coffee drips down into the pot. Not unusual.
But what is unique, at least to me,  is the spout on the pot. It has a very graceful shape. And the end of the spout has a groove on the underside and a small slot-like hole in it. The groove is angled with the spout shape, but the hole is level with the bottom of the pot.

Because of this design, not a drop develops on the end of the spout . Somehow, the groove and the hole causes the volume of the liquid to go back into the pot via the spout throat and not drip or cling to the end of the spout.

The pot was made in Germany and I have a feeling this design is one that has been used there, perhaps in other places in Europe, for a very long time.


I'm going to try and incorporate this design into my next teapot and see if I can get it to work.

Does anyone know the origin of this design and have any more information about it?

Thursday, July 12, 2012

Bottles


This grouping of bottles are from a few years ago....They are a little bottom heavy, but in the case of making bottles, that's not a bad thing.


I was experimenting with corks and came up with an idea to cap a wine cork by glueing a top onto the cork after it was fired. Getting the measurements just right is a bit of a hassle, but the cork is secure and fits. I used Goop to attach it to the top.


I really like the way the celadon pooled over the white glaze in the short pot.

I made applied 'buttons' as decorations. The button is actually patterned with a real antique button mold. I made the mold with clay, fired it, then pressed the soft clay button into the bisque mold to reproduce the original button form. You could do this with many different kinds of molds to make all kinds of button decorations on your pots.


The small piece only has a sort of spike shaft at the bottom of the cap. It rattles around right now, but I will find the right cork and hollow it out to fit the shaft.


I like the balance of this tall bottle. Great for single branches and tall flowers. Ridges and finger rings add interest to the shape. There's a lot of exploring to do just in where the rings are placed on the form.

This smaller "buttoned" vase goes with the larger corked one. I believe I made it first, then made it's 'sister'.


Click below for a larger image


Sunday, July 1, 2012

Momentary Inspiration


While cleaning out my iPhoto files, I ran across this older picture of a slabbed bowl.  And I was reminded of how it happened to be made.

I was slabbing out clay for something entirely different and after the piece came out of the roller, I was taken by the shape of the rough slab.

I immediately scrapped the idea of using it for the piece I had previously planned and grabbed a small steel bowl from the worktable, turned it over bottom-side up, tore off strips of newspaper, dipped them in water and laid them over the bowl.

Then I coaxed the slab from the roller, gently placed it over the bowl and smoothed it over the bowl and flattened it to the table surface. As soon as the clay was hardened enough to lift off, I removed the bowl and, still leaving it upside down on the worktable, allowed it to dry to leather hard.

I smoothed and trimmed the edges and fired it upside down on the kiln shelf. Pre-bisqued tiles that I have around as set tiles came in handy for supports and to allow air to circulate under the piece.

Glaze firing was done with the bowl right-side up and a simple design worked to emphasize the  undulations of the form.

I don't have this bowl any more and this is the only picture. I photographed on the driveway just as a record and reminder after it came out of the kiln.

It is good to follow your flash of inspiration wherever it leads you.

I must try this again.....