Showing posts with label Cooking. Show all posts

Saturday, March 30, 2013

Design Inspirations - More Cast Iron


I once did a unit in secondary school that required each student to take a look around their house and pick an object that was of good design or poor design.

They were to bring it to class for discussion about why it worked or didn't; functionally and design-wise.

It turned out to be one of the most successful class units ever. (Especially since we had run out of art supplies by mid-year and the budget to buy more was non-existent. But that's another story entirely.)

Anyway


The beautiful pot below is by Alessi La Cintura di Orione and designed by Robert Sapper, a German industrial designer born in 1935 and based in Milan.

It is a really successfully designed oval shape.

Of course, the handles definitely would not work in clay, but in this case, their overall treatment certainly works well.

Why? because of the beautiful proportion and contrast of the bulk of the vessel offset by the lightness of the side handles and lid top.

All three of them relate to each other and counterbalance the mass of the pot.

You can certainly believe you could lift the pot with the side handles without burning yourself.

The only thing that bothers me about this pot is the lightness of the lid top.

Sapper has taken advantage of the strength of the material in the side handle designs

And by modifying the shape, he has retained enough of that look to relate the lid top to the side handles.

But, I would make the lid top loop a bit larger and thicker.

Also, I would prefer a galley under the lid so liquids would not spill over the rim. (Maybe there is one and it isn't obvious from this view.)


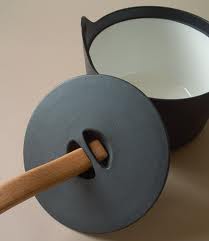
The casserole below designed is designed by Sori Yanagi, son of Soetsu Yanagi, the leader of the Japanese Folk Arts and Crafts Movement. That group's philosophy was  to design an object that is not only simple and beautiful, but equally practical.

Sori Yanagi was born in 1915. And his work stands the test of time well.


The rim outside promises liquids will roll back into the pot.

The handles are sturdy and the shape flows outwardly naturally.

You feel that can pick this up and have confidence in the strength of the balance of the side handles.

The top knob is not in conflict with the simplicity of the side handles.

I'm not crazy about the removable lid lifter, but it is simple and functional.

Wednesday, March 27, 2013

Design Inspiration - Casseroles


I was perusing a remodeling site and ran across a summary of beautiful cast iron casseroles.  I've always had cast iron in the kitchen and love to use it because of the good heating qualities and just the great look of it.

So, of course, I had to stop and look at the selection.  It made me start to think about good design in large functional bakers and how these ideas in iron could translate into clay.

Even though a couple of these vessels look very modern, some of them have been around for decades.  So it only goes to show how good design always prevails and looks great even though it was first created long ago.

The first example is one made in 1960 by Timo Sarpanerva.

The handle is wooden, but easily slides away from the loop handles for baking in the oven. It makes me think of a yoke. I've coveted this casserole for years.


The handle is so cleverly made that it doubles as a lid lifter also.  

(It makes me think of my grandmother's cast iron stove and the lid lifter she used. She would hook it into a recess in the round iron plate, the fire would leap up--very exciting to a little kid--and she would deftly slip small kindling pieces into the hole, then slip the plate back on, remove the lifter and cook a whole meal on that hot, flat surface.  She could make that old stove hum.) 


Here's an oval variation by Sarpanerva. Somehow, though, to my eye it does not have the wholeness or the unity of design the round one seems to have. Without the completion of the negative space of the handle, it begins to have a 'laundry basket' look.

I would worry about the stress on the wooden handle and think it should be more arched for eye appeal. 


It took a while to find a photo example. I don't think the oval one with the wooden handle is still in production. I did find it listed without the handle, though.

The round casserole is available, however.


So, could this be made in clay? Sure.  The idea of a lid lifter could certainly be adapted to clay. A wooden handle would look great paired with clay.

Elongation of the  handle loops and a reinforced design could be adapted. A new work in homage to Sarpaneva's design would be in order.


More iron casserole design examples to come.........

P.S. I usually don't make and don't particularly like oval bakers. Unless you're baking a chicken or larger bird. In that case, oval works well. And certainly oval bakeware stores nicely. But making a piece in clay is much easier to make in the round--especially with a well-fitting lid.

I did see Joe Bova make a beautiful oval casserole and he made the oval lid by slabbing out an oversized rectangle of clay, draping it over the leather-hard casserole and letting it slump naturally into a lid shape. When it became leather-hard also, he trimmed it and fitted it into the upper groove. He said he bisqued the piece with the lid inverted also.


Thursday, August 16, 2012

Egg Separator

One piece that survived the kiln overfire was a small egg separator.

It goes without saying that the inside  must be absolutely smooth.

My thinking is that this little thing might be handy to have in a kitchen drawer.

If you can crack an egg with one hand, you can hold it in the other hand.

Or it could sit over a glass, measuring cup, inside a small bowl.

I like it so much I think another is in order and maybe this time with a matching cup to go underneath.
The dome design would work well as a lid for an incense jar or a garlic keeper too.  Here it is sitting on a small flared bowl. I think lips and flanges are in order for a jar or keeper, though.


Sunday, August 29, 2010

How to cook a Sockeye


The Sockeye are running and boy, are they good.

I never imagined I would be able to discern different types of salmon, but after living in the Northwest for so many years, I've found that Sockeye tastes different than Coho; Cut Throat tastes different than Chinook.

When confronted with my first fillet of fresh salmon, I didn't have a clue about how to cook it. I was advised to layer it with slices of orange and onion, wrap it in all up in foil and bake it.

Later, when I got a beautiful hunk of fish, I remembered a wonderful breakfast I ate in Japan. I was traveling with a group of potters and we had stayed in a traditional Japanese Inn. The innkeeper gave us a most unusual and delicious breakfast: Cold trout that had been cooked in a sweet soy and spice sauce. (If you're ever eaten fish with hashi, while the fish--head and all--looks on in shocked horror, is an adventure in dexterity.)

I remembered that wonderful cold fish and tried to duplicate it's flavor. So here goes:

Mix a up a combination of the following:

1 T. sugar (brown sugar is good too)
3 - 4 T. Japanese rice vinegar or sake, if you choose
Stir until the sugar is dissolved.

Add olive oil equal to or 2/3rds more of the vinegar (ex. 3 T. vinegar; 5 T. olive oil)
Add in soy sauce to taste. I usually put in an equal amount of soy to vinegar
Add Basil, garlic, bay leaf, Worcestershire sauce--whatever seasoning you like.

Mix this all up and set aside. Be sure to mix again before adding to the fish.

Put some extra virgin olive oil in a non-stick pan. Heat it to medium-high and lay the fish, skin side down into the oil and cook until you see the meat change half-way up the fillet. Gently turn the fish over and begin cooking the other side.

Just after you do this, pour the seasoning mix over the fish. If your pan is hot, it will sizzle a lot. Turn the head down and poach the fish to finish cooking. The sauce with naturally thicken. Spoon it over the fish if you want or drizzle it over the finished dish to serve.

Only turn the fish once. Serve with a green salad and home-baked bread. Or make sauteed spinach and breaded tomatoes as side dishes.

I love cold, left-over fish for breakfast. Served with buttered toast points, it's privileged eating indeed. I remember that great cold Japanese trout, the kippered herring from the UK, the wonderful pickled herring I first ate in Amsterdam.

Every molecule of my Scottish and Scandinavian DNA rises up and thanks me with each mouthful.

Sunday, December 20, 2009

And now for something completely different......


Here's a fruitcake your friends won't "re-gift" or use as a doorstop.

Every year I bake it for my children's families and ourselves. It's not the kind you make in October and keep pouring the Napoleon brandy into every so often, although you can do this if you want.

It all started because I can't eat the multi-colored citron you find in stores at this time of year. They are all preserved with sulfur dioxide. I'm allergic to that. It gives me migraine.

A few years ago, I discovered non-sulfide mango spears. I had experimented with substituting dates, prunes and nuts, apples. They were all good, but not quite the texture I was looking for. So, one year I put in the chopped mango and Voila! --perfect fruitcake.

So here it is.

I don't give this recipe to just anyone, mind.

Dark Fruitcake

3 c. raisins
6 oz. orange juice concentrate, undiluted
1/2 c. molasses
1/2 c. sugar
1 link (1/2 c.) butter
3 eggs
1 1/4c. flour
1/4 t. soda
1/2 c. chopped walnuts
1 teaspoon each of cinnamon, nutmeg, cloves, mace, coriander, ginger and allspice
1 c. diced, dried papaya

In a saucepan, combine orange juice, molasses and raisins and heat until bubbly. Simmer 5 minutes and cool.

In a bowl or mixer, cream butter and sugar. Add eggs.

In another large bowl, sift dry ingredients. Add butter, egg, sugar mix and blend. Add nuts and then citron/molasses/orange juice mix. Blend all well and pour into:

2 loaf pans, greased and floured, or one large tube pan.

Place in the lowest shelf of the oven and bake at 275 degrees until a toothpick inserted into the center comes out clean. --About 1 hr. for tube pan, 45 minutes for the loaf pans.

Cool and put in air-tight container (add brandy if you choose after 1 day) or wrap in plastic wrap until ready to eat.

It smells heavenly while baking; is better after one day (if you can wait that long!)

My Gift to You! Merry Christmas


Monday, November 30, 2009

Pie


Every year at this time when I make the pies for Thanksgiving, I have this thing I wonder about.

My mother always cut the top pie crust in a design that looked like either a Fleur de Lis or Prince of Wales feathers. For years, I thought everyone made their pies this way. Then I began to notice that none of my friend's mothers put distinctive designs on their pies.

I asked her once and she said that that's just the way the pies were cut. Her mother did the same design.
So, was it a Loyalist symbol? I know people who supported the Crown in England quietly signaled to others their political sympathies in subtle ways like this. Is the design the three Prince of Wales feathers? If so, who did this? Maybe it was from the Scottish side of the family in support of Bonny Prince Charles.

Or is it a symbol of the French Fleur de Lis? My mother's grandmother was named de Bord. Was she showing her French heritage? Maybe she was from a Huguenot family??


If you compare the Fleur de Lis and the Prince of Wales feathers, they are very similar.

Our genealogy traces her famly to the Sanford family and back all the way back to the Plantagenets. Their symbol came from a plant known as common broom. It grew wild and the founder of the French branch of the family liked to wear a sprig of the plant in his hat.


Could the family have held onto this design for generations?


A sprig of the broom plant that the name Plantagenet refers to.

Tuesday, September 8, 2009

Preoccupations

I've been spending a lot of time lately processing peaches. We have a wonderful "frost peach" tree growing alongside our entry way that, this year at least, has decided to share it's bounty in abundance.

It bloomed like crazy in the spring giving us a waft of perfume and a visual treat every time we went in and out. The carpenter ants attacked it and my husband sprayed and covered the tree-wound with a protective strip of metal. I cropped back what my grandfather used to refer to as "water sprouts" when they appeared. When the blossoms cascaded down to be replaced with downy oval fruit starts, I thinned them out. I think now I should have been even more severe.


Every day for the past few weeks, we have gone out to collect the fruit before it falls to the ground. The result has been overflowing bowls of nearly-perfect to perfect peaches.

I have put up jars of pickled peaches, jars of peaches for future pies and desert, and jars and more jars of peach jam. We have given bags away. We've eaten them almost every day in one form or another. We are nearing the burn-out state fast.

Come fall, we will crop the limbs back severely to protect the tree from it's own enthusiasm. And I'll be sure to thin even more when the fruit starts appears again.


Beside the peach crop, we have harvested blueberries, rhubarb and now, hopefully the elderberry bushes will produce enough of that precious fruit for my private reserve of jelly. We hope for enough tomatoes to put up a few jars for winter eating.

So, for now, I must answer the garden and honor my own thrift.


Sunday, July 13, 2008

Firing Update

Firing completed. All tiles came out perfectly. Now to waxing the bottoms, a glaze dip and the final firing. Yea!

I'm firing a second bisque load now with glaze tests to decide on which glaze to use. The tile guy comes tomorrow. He was sick all last week which gave me some wiggle room.

In celebration (Not of the tile guy's being sick, but of the successful firing), I had the last piece of lemon pie with strawberries. I'd show a picture of it, but it's all gone now.

Actually, it's the extra pie that I stuck into the freezer after everybody left following the Fourth of July. Didn't know it for sure at the time, but it freezes really well. This pie is about the easiest, simplest pie Ever, hands down, bar none, tampoco:

EASY LEMON PIE

1 Graham cracker prepared crust
1 can Eagle Brand Sweetened condensed mink (14 oz.)
3 medium egg yolks
1/2 cup fresh lemon juice (ca. 2 lemons)

Mix lemon juice with egg yolks using a wire whip. Add condensed milk and blend well. Pour into the prepared crust. (Turn down the aluminum edge to protect the crust from too much heat. And of course, unfold the rim for serving!)
(Save the clear plastic lid so you can put it back over the pie for storage in the refrigerator or to seal it up for for freezing. Crimp the rim back over the plastic lid edge.)

Bake at 325 degrees for 20 minutes. Check and rotate the pie. Bake about 20 minutes more. Pie should be lightly brown. To test for doneness, insert the tip of a knife into the center. If it comes out cleanly, the pie is done. This is a very rich pie, so smaller slices are in order.

Serve hot, cooled or frozen. Great with strawberries.

Saturday, March 22, 2008

New Old Toys

The other day I bought an only-used-one-time; didn't-like-it almost-new breadmaking machine for 10 bucks.


(Look at this baby. Bet you could knock off a few loaves with that. But that's not what I bought, more's the pity.)


Now, I've never had a breadmachine before. Years ago I made all the bread we ate when our kids were small. I have a cherished recipe for oatmeal bread and another for Swedish bread which I used to churn out with great alleau*

*Not a French word? Sounds good. It Should be a French word! Definition: Accomplishing a complicated action with dash and style; "wit won han behind ma baaaaak."


Then I got the bread machine. . . . . . and I discovered I CAN'T MAKE BREAD.

What could be wrong? I read the directions. I measured everything. I threw in the stuff in the proper order. I turned it on.

Result: Brick. Actually worse than that. A brick that caved in on itself.


Okay, okay. I used regular all-purpose flour. But I got the fast rise yeast.

Read the book again.

Another brick, only this time too salty.


Read the book again.

Added an egg.

Another brick. Made croutons.

Searched the book. Searched the web. . . . . . . .

Remembered I'm not living at sea level. AH-HA!
Reduced the water. Reduced the yeast.


Voi-la! Bread!


I'm afraid I'm enjoying this too much.

Monday, March 3, 2008

Oil & Vinegar


Made on the wheel with Coleman Porcelain cone 10 clay. The glaze is black (slightly corrupted) overlapping an Ohata white.

Note: Care must always be taken when storing vinegar in a glazed container. Actually, it's probably not a very good idea unless you know the liner glaze is very stable and has no elements that could leach out into the vinegar. Also the vinegar's acid will discolor the finish.

The smaller container will probably not be used for vinegar--I prefer to store vinegar in glass. That's why I won't buy vinegar packaged in plastic bottles. I'll search for a cool looking glass container that I can stick the cork dispenser into.


I love making my own fresh salad dressing: One Serving


1-2 teaspoons sugar/honey/molasses. to taste
2 T. Japanese Rice Vinegar
4 T. good quality olive oil
Herbs and other additions, see below.

Mix sugar and vinegar first until sugar dissolves. Add olive oil and blend.

You can add any of the following to vary the mix:

Basil (my favorite)
Cilantro
Thyme
Soy Sauce
Mustard
Crumbled Blue Cheese
Italian herbs
Garlic