Showing posts with label glazes. Show all posts

Saturday, November 29, 2014

Spoons - Form and Decoration, Part V

It could be argued that all spoons made by hand fall into the category as an art form, as these beautifully graceful salad spoons demonstrate.


These natural clay spoons, when assembled into a display, become an exercise in pattern and form. Yet you could pluck any one out of the arrangement and use it.
No problem firing these!


I'm not sure what the material is used here, but this decoration is a great inspiration that transforms these spoons or dippers into art. Equally functional and artful.


This grouping with similar roundness of spoon bowls, yet varying sizes, similarity in handles, yet variations also in length and thickness still function as a grouping.


And these seem so organic, they could have been picked up on the seashore.  Great interpretation and glaze.

Different handle length and uniformity in similar bowl size create a grouping, yet they all become very individual because of the free expression in decoration.

I like the onion-like lines on the spoon to the far right.  Look at the negative space created by the length of white left on each handle.

With the two strong forms of the linear handle and the roundness of the bowl, there are two opportunities for endless decorations.


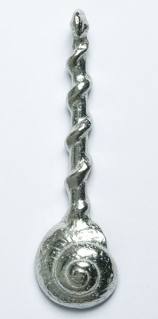
A slight segway here--

I have a 'thing' for shells. So, of course, I love these two examples of silver spoons with a shell motif.


Monday, November 24, 2014

Even More Spoons, Part IV

There are many approaches to making clay spoons.

You can create molds for multiples of the same and matching shapes or make a series of all the same shape.

Or:

Same bowls, different handles

Same handles, different bowls

Make them all the same with the same glaze.
Aren't these gorgeous? 


Natural clay handles might simplify how to fire them in the kiln--supporting them by laying them across kiln posts, making a clay support or by stilting them. 

Of course, if you plan to attach a handle, firing the bowls of spoons are easier. The could be stood on end with a bead rack or other stilt form, then handle and bowl are glued together. 

Making ceramic bowls and handles that would later be glued together might be another experiment. I don't think I've ever seen that.....


Fitting them with wooden handles like these measuring spoons, or with driftwood handles.

A great website that matches materials to other materials with the right glue can be found at http://www.thistothat.com/. 

If you're in to glue trivia or news, it's also the webpage for you!


Maybe using spoons to test glazes would be an even better than using test tiles. 
I think I've come up with a brilliant idea!!


And, a word of advice, though. If you plan on making a set of spoons or a collection of any kind, be sure to make extras!

There will still be more posts on spoons to come.


Friday, October 25, 2013

Being Your Own Inspiration


Many times we go to workshops, seminars and conventions, listen to lectures, buy books, watch demonstrations, try our hand at new techniques and become inspired to create new works.

It's good to feed that creativity and sharpen skills,

But

Sometimes in all the flood of the new, the exciting, the dazzle, we can lose ourselves.


That's why it is a good idea to keep alive all the essence of what you and you alone can do.

Keep a good record of your work to remind yourself where you were going with a certain piece; make a note of construction, alterations, glazing and firing as well as what inspired you to make it or what your thoughts were while you were in the process.

I used to think I would make only one piece each time, but I have come to think that making two is better, at least for me.

 I also like to set the finished work in front of me and take a good look at it. I make notes about what problems I encountered, what surprises happened and what I would do if I made it again.

Those are written in the margins of my journal that I keep as I throw or construct work, through the glazing process and after firing. That way the whole history of a piece is located in one place. And I don't really care if it is messy or not. Sometimes fast is better than neat.


Friday, August 31, 2012

P.S.

Remember the Racer?

 Here's what it looked like prefire.
I like the way the edges ran down the corners and pooled in the corners of the small square. I'll remember that the next time I make this form.

The mold for this is an el chipo plastic 1960s dish I found at the thrift store. Great place to look for clay forms. The good thing about this is I can lay a slab down on the plastic which I line with damp strips of newsprint, and just let it dry. The recessed center makes a good foot on the dish.

Wednesday, April 13, 2011

Baking Dish


Since I love to bake, I make and sell a lot of baking dishes.

I also love this shape.


Baking dishes should be:


Large.

Thick, to hold the heat.

Rather shallow for quick baking and for crispy topping.

Have a flared shape for easy handling.

Smooth with a curved inner surface between the sides and the bottom for easy serving and cleaning.

Equipped with handles for added ease in handling.

Totally smooth with no cracks or crazing.

Beautiful on the table.

Saturday, March 26, 2011

Big X


This is a test of two contrasting glazes.

The base is a Chico Glaze's Copper Blue. The big X is Eggplant.

The plate is fairly large; about 16 inches in diameter.

I love doing this kind of glazing--you just take a big breath, and DO it. No going back.

Friday, July 30, 2010

"Room Temperature Glaze"

So I've been cleaning and sorting out the studio lately and ran across this small tray that's been knocking around for some time.

Originally it had only the 6 blue dots in glaze, which did nothing for it.

I stopped, took a good look at it and, grabbing my 'Room Temperature Glaze' of Pebo Porcelaine and a liner brush, added a few brush strokes and now the whole thing looks much better.

This finish will set in a kiln temp of 300 degrees for 30 minutes. And it truly does bond with the glaze.

This can be done in a regular household oven, but I'm not having that--don't know what kind of nasty off-gasses might stick to the oven lining and transfer into the next loaf of bread dough--not worth it, to my mind. So, I would recommend putting it into the next kiln firing at the very first when you're candling the ware or just do it in an empty kiln. I doesn't take long and you can dry a few pieces of greenware while you're at it.

Besides, this little tray is designed for serving only and not for the oven anyway. Doubt if I'll sell it.

I would use this on anything that is decorative. If you layer on several coats thinned with a bit of water, it produces a very satisfying result. And you can accomplish a nice watercolor effect as in the tray.

Given the choice between this as an overglaze and using an underglaze, however, I'd choose the underglaze every time.

See how easy it is to get out of cleaning and organizing the studio?

Sunday, February 21, 2010

Write It DOWN!


How many times have you done something with glaze, just on a whim while you're into glazing, didn't write it down and by the time you've made enough stuff to fill the kiln and finally fired it all and then take the work out and say "WOW, LOOK AT THAT!", you've forgotten what the heck you did?


Not only is the above one of the longest sentences in history but, unfortunately, it is a true sentence.


It's happened to me 'way too many times. Here's an example:

This plate was done in a workshop with unfamiliar clay, unfamiliar glaze and a different kind of firing. So I have an excuse.


But seriously, I did work up a page for my studio notebook that has a header showing the date, the cone, whether it's a bisque firing or glaze firing, how full the kiln was, how long the firing took. There is space below the header for a quick drawing of the pieces, notes about the glaze, etc. and in the upper right corner, a marked-off square for after-firing comments.

Like: Don't use this glaze over that glaze. Or
This glaze needs to be put on thicker/thinner.

It helps.

If you remember to do it.

Thursday, March 26, 2009

Vase

This is one piece I'm taking to the Tucson Art Museum Artisan's Sale March 27-29th.

Although it looks like it has three different glazes, it's just two.

I made it in a class and truly have no clue about the they were using.


I just layered them to test the reaction and drizzled the lighter one over the body of the vase for a fourth effect.

The orchids are the only kind I can grow--plastic.

It's definitely a one-off.

My work will be in the Southern Arizona Clay Association booth.

Hope to see you there!

Sunday, October 19, 2008

Funny Old Glaze


Would you believe these two pieces were fired using the same glaze?


Here's the whole story.

This is a glaze I purchased from Seattle Pottery called "Moss Brown."

When I first used it on the oval-bottomed baker, I first ran it through a Talisman sieve that removed rather large granulated sandy sludge. I was concerned when that happened that if I left it in the glaze, it wouldn't melt and I'd get a rough textured result. I was experimenting with varying the layers of glaze and was rather liberal with pouring and sloshing. (I like to glaze listening to Queen.)

Anyway, since practically everything I do is an experiment, I thought, "What the heck. Let's see what happens."

I liked the result.

Much later, I ran across the saved sludge in a container labeled "Sludge" and the next time I used this glaze, I added the stuff back into the mix.

The result was the round, very large dish shown at the top. It has a lovely matt, slightly textured surface. I wouldn't use it for baking, the glaze is too open, but it looks great on the table.

Monday, September 8, 2008

Swimmer


Before I knew that you couldn't paint with glaze, heh, I made my "Swimmer" serving dish. Really, I lucked out here since the ground is a semi-matt yellow glaze that is very stable and painting over it is lightly done with cobalt.

The cobalt glaze was watered down. Since it is such a strong pigment, it shows up well even when thin.

Even though "Swimmer" is not falling, the imagery could be of someone falling as well as that of a swimmer. The inspiration for this design is the story of Icarus, the man who, along with his father, made wings of feathers and wax and flew. But Icarus, being a young man, became enthralled with going higher and higher and flew too close to the sun, which melted the wax and he plunged to earth and died.

Icarus has been represented many times in works of art and it's a theme that I roll over and over in my mind. One day I'll make a sculpture of it.

Hum--there's that flying theme again.

Tuesday, September 25, 2007


Sometimes ya just gotta do something tedious.

I really don't know why.


I learned how to do this technique when I took a class from Galina Rein, a Russian artist who emigrated to Seattle several years ago. It's basically forming tiny flowers and design elements with the fingers and attaching them to a basic form. I use cast-off dental tools to attach the tiny components. This topper is about 4 1/2 inches tall.

After the class I went nuts making porcelain Christmas tree ornaments, light string-pull endings, pins, earrings, and wedding cake toppers.

The second topper pictured has two components. It is a bell and base. The bottom of the bell is slightly out of round so that it sits on top of the base and, by twisting it, seats onto the holders so that it becomes one unit.


I experimented with texturing the base with a needle tool. I rather like it, but it needs more experimenting.

This piece stands about 5 inches tall.


They take FOREVER to make.
They can't dry out AT ALL.
I don't know why I make them; nobody could afford one, I'd have to charge so much for it.

After make one of these, I gotta go sling some glaze or something.

Saturday, August 18, 2007

Problems

There’s the old Chinese wheeze - something about “Every problem has a gift in it’s hands” which I have always filed in the Mental Sour Grapes Junk Drawer, but recently that very thing happened to me. I made an 8-piece set of “Cat Plates” drawing the cats and the trim with black underglaze. They were porcelain and finished with a cone 6 clear glaze. In the final firing, the clear glaze reacted with the black underglaze in the banding resulting in a small area of a sort of wispy grey on the black. In another area, there was a tiny bit of black ‘creep’of fine lines into the white ground.

It didn’t bother me, but it did bother the lady who bought a whole set. A request was made to replace that particular plate, which I was glad to do. (I want my customers to be satisfied. Besides, the gallery that sells my work has a reputation to uphold as well.)

So, I tried to duplicate the plate. That didn’t work. Too many variables: Clay density, throwing variation, glaze and underglaze consistencies, my memory...... I usually do extras when I do a whole series of one thing, but you guessed it. This time I didn’t. Okay. Lesson learned.

I asked that the plate be returned to me in order to get it right. Previously, I had used an overglaze on clear-glazed ray guns that had been underglazed in bright colors. I thought I’d try using a black overglaze to correct the banding. I tested it first on a similar plate and not only did it work, but it worked seamlessly.

New revelation! It is extremely workable, it is also extremely tinker-able. I can erase what I don’t like quickly with a damp sponge or Q-tip. If it’s dried, I can alter or etch lines into solid areas using a needle tool. I can write script using a fine liner brush. There’s much to be explored here.

Tuesday, June 26, 2007

From the British Museum

This is a surprising object. First of all, it looks quite old. And it is in the British Museum surrounded by unique, one-of-a-kind examples of Japanese art. I photographed it because I had never seen a ewer quite like it. I estimate it to be close to 9 inches long. It has a nice porportion and looks like it would serve it's owner well. The decoration fits the form and is beautifully executed.

Imagine how surprised I was to learn that this is a modern piece. It was made around 1990 by Soma Masakazu, an artist born in Okinawa in 1949. The information card reads:

"This ewer is designed for pouring alcoholic drinks. It has a typically Ryukyuan combination of clear, bright colours. The distinctive curved shape, called a dachibin, can be worn at the hip. Soma, the maker has given the traditional local style a modern twist."

The piece is stoneware and was donated by the artist. It would be a great form to experiment with.

Wednesday, May 2, 2007

Clay Jags

I'm on another 'clay jag'. It happens. I get all enthused about making a certain form--in this case, tumblers--then try and see how many different kinds I can make. Sometimes I have to race to get the ideas all down on paper before going merrily off on another 'jag'. This finished tumbler was made while taking a class by Jamie Walker some time ago at Pottery Northwest on painting on raw clay with underglazes. It's an experimental piece. (Pfuut! as if that was something new. Nearly everything I make is experimental.) The designs were lightly drawn in pencil on a slightly damp thrown piece then outlined and filled in with a brush and underglaze. I used a bit of scraffito on the wide band at the top just to see what would happen. (I love to use it because it holds a pint of liquid and has a very comfortable lip.)

So here's some tumblers in process on the current jag: They have been thrown on the wheel and altered, they are awaiting a complete dry-out before being put into the bisque kiln. The first series of 6 (really 7 just in case and to keep a reference piece) were what I'm calling Innies and Outties. They either have areas that are pronounced dents or bumpy bits added to the outside. It's amazing how interesting they are to hold. A hand diversion.

The second is pure class. I have a stamp which I used to make the center medalian. First, I stamped slabbed clay, then thought, "How can I make nice clean cuts around the shape? I know, where's my biscuit cutter!" There's an old cutter rattling around somewhere in my studio. (See, that's why you need all kinds of crap in your studio because when you need it you NEED it.) I made another set of 6 with this motif, but with more going on with the surface--nubs and dents. The one pictured here is sort of an 'out-take'.

And the final set of 6 are tumblers on small pedestals. These are thrown separately and will be bisqued as two pieces, then glazed and fused together in the final firing--another test to see if THAT will work. I'm seeing these in a reddish brown with dark chocolate brown interiors and bases. We'll see.........

I still have more designs to go. Another set of 6 with the flared lip and oriental-like stamps down one side, a set with a series of large dents and indented lines, and yet another set with an underglazed big, dark spot on one side.

Friday, April 27, 2007

Paul Lewing's China Paint & Overglaze


Paul REALLY knows his stuff. This is a great book. This book covers so much territory, it's a mini history of an area of ceramics that has not been addressed in such a contemporary way. With this book, Paul has created benchmark and a major reference as an example for others to use in this kind of research. It's a great resource not only for potters, but historians, china painters, antique dealers and collectors.

I know how long he has been working on this and the results are stunning. I'm savoring this book in bits in order to absorb the amount of information that is packed between the covers. Paul not only is tackling the subject full-on from the origins and progression of china decoration through cultures, there's a complete data dump of technical aspects; tools, chemistry and technique. Makes ya want to run, RUN to your studio and start working! (Big problem there, since I usually get my reading in while all tucked up in bed between 9 p.m. and 10 or 11 o'clock at night.)

Beside being a luscious book to look at, it's a generous one. The narrative is easy, just like talking to Paul, and completely comprehensible. He holds nothing back, giving everything he knows and he knows a lot. I'm so glad the publisher, The American Ceramic Society, splashed out in heavy-duty slick pages and beautiful color photographs.

You may need two copies. One to keep pristine in your house and one to paw over in the studio! Go to Paul's webpage at www.paullewingtile.com to order the book.

Wednesday, April 25, 2007

Another Example of Appearance


This bowl is made with a basic white glaze and various glazes applied over the base coat.

This is a minuet, ballet music, pizzicato. It has a completely diffferent look than the second bowl--

The second bowl is only two glazes overlapped in different ways: A shino which breaks into a reddish color when thin; cream when thick and a satin black that reacts depending on which thickness it is over, how thick it is.
This is Wagner, trumpets and horns, drums and cymbals.