Showing posts with label glaze. Show all posts

Monday, June 15, 2015

Pitchers


In this blog, I have shown pitcher forms before, but have not gone into detail about how they are made or how the form has evolved during the making.

This is a very small free form hand pitcher made from a slab with impressed design using a swizzle stick, a sea shell, and a bit of styrofoam packing material.

To make the pitcher, I cut out a bottom freehand in an oval-ish shape, then curved the body of the pitcher slab around the edge of the bottom to fit. I used the clay worm method to seal the sides and bottom together, closing the form with one seam at the front where the spout will go.

I cut a V shape in the front to fit the small hand-formed spout. I left evidence of the cut. I liked that and made a note in my mind to repeat it.

The glaze is celadon and the body is porcelain.

This is a later version of a more distinct surface treatment. This time I added two new patterns; a combed effect. The checked texture is from a scrap of plastic that I picked up in a parking lot. Must have been a part of a tail light….

The basic construction is the same as the hand pitcher shown above, but the body shape was drawn out on a piece of paper before assembly.

There is only one seam in this pitcher also under the spout. This is the beginning of new thinking about spout shapes.

During assembly, I decided there was too much stress on the dip area between the spout section and the back section, so I added a reinforcement 'button' to keep it from splitting. It makes a nice transition element in the design.

The hand fits nicely around the back of this pitcher with the curve resting easily on the hand between the thumb and fingers.

The body is porcelain and the glaze is a semi transparent rutile.

This little guy is also small. It is one of my first tries at hand formed pitchers. Unfortunately, (or fortunately) I sold it. But at least I did have the gumption to photograph it.

In this case, I made the seam down the side instead of under the spout and cut a hole for the spout.

The same technique of cutting out the base first, then forming the body from one slab piece was followed and the spout is also hand-formed.

I pooched out the bottom a bit to give it weight.

This piece served as a glaze test as well. I liked the texture of the slab roller matt showing under the glaze. I named this piece "Black Nose" in my mind.


Another look at an earlier slabbed approach. Basically taking the same form and making two vessels into a creamer and sugar.

The forms are a bit more free and I was playing around more with altering the body and adding feet made of rolled clay.

It is also a glaze experiment using a white body and drizzling a dark brown glaze over edges of the form.


This is a medium sized pitcher and a very early piece. My main experiment was working with the relationship of the handle and the spout.

I wanted them to be the same size and I used the same trusty texture-making tools here. But the difference is the weight and thickness of the glaze. So the pattern comes off a bit more muted.

And the handle is the beginning of thoughts about using rolled clay and the attachment process for a vessel.


This is a larger pitcher form, but here in the the watering can version. I am still experimenting with the spout and handle idea and also using texture on the exterior.

The thicker glaze mutes the surface more than I wanted, but the ideas of spout and handle are still being explored.

This piece is also in porcelain and the glaze is a version of weathered bronze.

The seam is still at the front of the piece and the spout is cut in and attached.


A new approach; using a thrown form and keeping the handle/spout forms only refining them. This time I'm cutting both the places where the handle attaches to the top rim as well as where the spout attaches.

I again used the reinforcing 'button' at the split for the top of the handle.  The spout is laid into the front split and blended into the body of the pitcher.

The new spout form is an imitation of a tropical leaf form; designed to shed water. It works very well.

I love the break in the glaze. It is Coyote Crocodile glaze fired at cone 5 OX. This is a slightly larger pitcher and it's a keeper.


The next pitcher is the same technique and form, but what a difference a glaze makes!

A slight modification to the form is the elevation of the base with the use of a bevel tool at the end of throwing. It improves the overall look of the piece, I think.

The clay is porcelain and the glaze is three different shinos.

This is one of my favorite pitchers.


Sunday, April 5, 2015

Mystery Teapot

Some time ago, I published a photo of this pot on the blog.

Unfortunately at the time, I couldn't find the maker's identity.

I included it in the post anyway because it's such a great piece.

I like the lovely glaze variation. There's lots of planes and surfaces  to show it off.

Three oval loops - each an individual statement,  yet relating nicely in oval form to each other and giving a wholeness to the piece.

Round-y additions that pop the mass and give references to each other, moving the eye. The bold statement of the spout.

Design rule going on here is 3 oval elements; 3 rounds and one strong variation.

Today, the maker of the pot contacted me.  She is a potter who works in St. Louis and her name is Yael Shomnoni. You can see more of her work at http://www.yaelshomronipottery.com.

Nice to hear from you, Yael, Great Work!

Friday, October 25, 2013

Being Your Own Inspiration


Many times we go to workshops, seminars and conventions, listen to lectures, buy books, watch demonstrations, try our hand at new techniques and become inspired to create new works.

It's good to feed that creativity and sharpen skills,

But

Sometimes in all the flood of the new, the exciting, the dazzle, we can lose ourselves.


That's why it is a good idea to keep alive all the essence of what you and you alone can do.

Keep a good record of your work to remind yourself where you were going with a certain piece; make a note of construction, alterations, glazing and firing as well as what inspired you to make it or what your thoughts were while you were in the process.

I used to think I would make only one piece each time, but I have come to think that making two is better, at least for me.

 I also like to set the finished work in front of me and take a good look at it. I make notes about what problems I encountered, what surprises happened and what I would do if I made it again.

Those are written in the margins of my journal that I keep as I throw or construct work, through the glazing process and after firing. That way the whole history of a piece is located in one place. And I don't really care if it is messy or not. Sometimes fast is better than neat.


Sunday, September 22, 2013

Inspiration can come from anywhere......


This is one of my favorite movies.

And when I finished the piece below, I named it, "Count Olaf".

I chuckle every time I look at it.


The piece is about seven inches tall, made by slabbing out some porcelain, impressing it with pieces of styrofoam packing material, a sea shell, comb, and a palm-sized piece of car tail light picked up in a parking lot.


Really, I started with a freeform teardrop shape for the base.

For the sides, I made a pattern drawn on newspaper and cut out makes the shape for the two sides of the piece.

I join the two sides using a score tool and clay worms and coax it into a standing form. This has to be done by using a very light touch because I'm working with rather wet clay. I prefer to join these kinds of pieces while they are soft. It makes for better seams. I have to be very careful not to disturb the outside design.

I shape the spout, making it bulge at the base, roll the back over and smoothing it out.

I put the flattened ball of clay 'button' at the point where the form makes a radical change. This is really to reinforce the change of direction that stresses the clay. And it makes a very good design element.

I also manipulate the form mostly from the inside with dampened fingers, pushing it in or out to manipulate and emphasize the curves. And I lightly support the outside while I'm doing it.


The glaze is an iron glaze with a creamy rutile liner and the piece is fired at a cone 5/6 oxidation.


Monday, August 12, 2013

Medium and Large Sized Bowls

Seems as though people make either small bowls or really big bowls. I hardly see medium bowls at shows. Yet, these bowls are sometimes the most useful.

It may have to do with kiln fit--small bowls can be placed around the perimeter; big bowls take a lot of kiln room, but are more impressive and therefore can be more expensive. Medium bowls are sort of misfits.

"Geographic Bowl"

This is a bowl I made in another studio setting than my own. It was an experiment with a different clay and different studio glazes. It's good to work with unfamiliar materials sometimes.

(Unfortunately, it is no more--lost when we had the flood and the packers didn't know how to pack pottery.)

It was about 6-7 inches across and of medium depth. Very handy size.


"Snowflake Bowl"  

This is another glaze test mostly. And it is a slightly bigger and deeper bowl than the previous one. The white glaze was poured in first, then the maroon glaze rolled around the rim. Great contrast where both glazes overlapped and were poured out.


"Gold Leaf Demo"

I love this bowl. It's totally useless, but I just like to look at it.

I was doing a demo about how to apply gold leaf and used this earthenware bowl to show the contrast in surfaces.

Come to think of it, since this is a non-utilitarian bowl, I wonder if another surface application like acrylic paint would be added to either the leaf or sealed earthenware???

Could be interesting.


"Flower Bowl"

Here's where painting with glaze works. The base is a yellow matt glaze. I decided to add green organic-like leafy applications and then use a stain for the darker cobalt blue and brown accents. 

This is a medium to large bowl, quite shallow, but with a larger circumference. This bowl barely left my hand in one of my first shows when it was snapped up. 


"Great Wall of China"

This very large bowl was a challenge. It is a monster. All hand-formed, it was made using a big, awful orange plastic mid-century salad bowl as a mold for the top and a paper pattern for the base. I worried quite a lot about getting a good fit between the two parts and about firing it, but it all went well.  This piece is still in my collection. It is worth an encore, I think.  

The glaze is Coyote Shino. It was murder to glaze; very cumbersome.


"Big X Bowl"

A very early piece, this is another bowl made using hand building over a form. Early in my claywork, I used mostly white or clear glazes, focusing mainly on form. It was quite large. The black glaze was slapped on using a big paintbrush. A second layer of a plumb brown glaze was laid on over that with a smaller brush. 

I made this after working on another piece that required very detailed and meticulous work. It's good to lash out on something else a bit, just to release that energy.


Not pictured here are bowls made using a blowtorch while throwing on the wheel to hasten the drying of the clay. Although a bit frightening at first, the Ken Turner workshop I took some years ago dispelled all that fear and I love to make whopper bowls using this method. Ken is doing a workshop on foil sagger firings right now. You can find him on the web.


The good thing about medium to large bowls is the opportunity to work with a bigger pallet and surface; make a bolder and a more eloquent statement. And, as in the "Snow Bowl" and the "Flower Bowl" expand experiments on a larger surface.

Sunday, August 19, 2012

A "Racer"

In every kiln firing, there is usually one piece that comes out better than you dreamed. Some people call them "Racers". 

Here's my racer.

This thing has been setting around on a shelf waiting to be fired for a long time. It's big. There hasn't been a firing that allowed a free shelf, so this piece got put off and putt off. 

But this guy made it into the OVERFIRE kiln. Yikes. All these glazes are supposed to be good up to cone 6. I don't know how hot the last kiln got because the thermocouple malfunctioned. The chances of duplication? almost nil.

I do know that this is celadon and iron applied over it.


It did blister a bit, but no explosions or craters. 

I just love it. It's a keeper.

Sunday, April 22, 2012

Lids and More Lids

When I make something like a covered jar or teapot, I always make two lids at least. Usually in two different styles.
Sometimes a pot can be spoiled by a lid failure--it warps, the glaze doesn't work, the lid gets dropped, etc.

By making two lids in the first place, there is always got another one to fall back on.

So, after a while, I have a lot of different kinds of lids. And most of them are just about the same sizes too.

I tend to make 3 to 4 inch openings on teapots. So after looking at the lids today, I am thinking if I made uniform openings, I would have a lot more interchangeable lids.

Take the the short teapot in the picture, for instance.  This time I made only one lid. And I wasn't all that happy with it.


While checking out my lid stash, I found one I like a lot better. It's a little loose, so I'm thinking when the pot is glazed and fired, the alternate lid should fit well. I'll have to fire it on a stilt since it has glaze already.

The glaze is an iron glaze. I had planned to make this pot totally black.

But, I like the lid so much, I think I'll tweek the whole glaze plan and lay down some subtle layers of iron first, then glaze with black. I'll put another layer of black glaze on the lid.

It should be interesting....

Tuesday, March 29, 2011

Sloshing Glaze


Sometimes, it's good to slosh glaze.

Here's a stoneware bowl, reduction fired, that I made during a class.

I was in the class because at the time I didn't have my home studio set up then.

Thankfully, the instructor excused me from most of the participation and just let me work.

Using glazes I was totally unfamiliar with and had no clue how they would turn out, I decided to do the "Ink Blot" approach and put a base glaze on, then slosh a contrasting one over the top, rotating the bowl to make it run in interesting patterns.

I think the purple glaze was called "Fish Guts" or something.

Not for the faint of heart.

Saturday, March 26, 2011

Big X


This is a test of two contrasting glazes.

The base is a Chico Glaze's Copper Blue. The big X is Eggplant.

The plate is fairly large; about 16 inches in diameter.

I love doing this kind of glazing--you just take a big breath, and DO it. No going back.

Friday, January 7, 2011

Tangents and Springboards

Springboards and tangents--the most brain tickling thing to do.


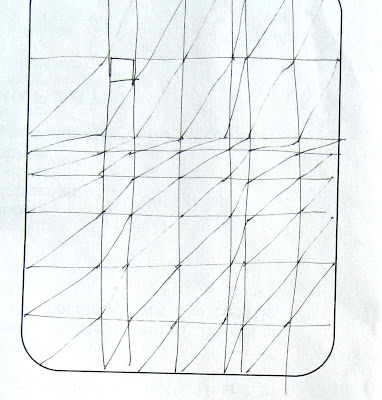
This is the sketch or doodle that started a train of thought.

Vertical lines at random placement across the form, then doing the same with horizontal lines, connecting a diagonal line at the intersections--simple as that.

Regimentation is created with the vertical and the horizontal, but the irregularity of placement creates interest.

The introduction of the diagonal creates the feeling of movement. However, if I were to draw diagonals in the opposite direction, the whole thing would become static.

Could be the beginning of a painting, fabric, metalwork. A broach, a wall piece. - think steel plate with gold pins and lacing of silver wire with one solid gold square placed three-fourths of the way up and off-center.


The design holds up. Theme and variation.

One way to know if a design has integrity is to hold it up and look at it from all four directions--vertical, horizontal, rotate it all the way around. If it looks good no matter which way it is turned, it's good.


What followed in the doodle process was not jewelry, but thoughts about a series of square, rounded-edged plates.

(The first has a note to do wax resist dots on the dark ground.)


Monday, March 22, 2010

Refires


Normally, I never reglaze and refire work. However.

I did try some transparent dribble on the purple bowl.


It certainly made the inside of the bowl much more interesting.

Along the rim, the Eggplant begins to separate into small particles of glaze. This could be investigated more....


The Copper Blue platter with thick Eggplant overlay was an interesting result. The Eggplant was dribbled on from a jar, so it's very thick. I like the result, but it is sort of a waste of the Eggplant glaze...


I'll probably fiddle with this platter more later on.

Friday, March 12, 2010

A Little Bowl


This little bowl just came out of the kiln. It measures 3 1/2 inches wide and 2 inches tall. It's as light as a feather.


It's an experiment in throwing very thin walls, using underglazes and a new transparent glaze. And a departure from a lot of the kinds of things I do. Whatever THAT is.

For a while I worried about establishing a 'style'. My conclusion: I don't have a style. I just do what works at the moment. My style is impulse.

Anyway, first, I must say the photo looks better than the real bowl. The yellow doesn't read this strongly. Should I fiddle with it more? The jury's still out. I'm tempted to add another glaze and refire, but that's kind of silly. Those kinds of things sometimes are disasters. I'd be better off just making another bowl and going from there, I think.


I think I'll call it "Egg".