Monday, December 12, 2011

The Palm Frond Dish - Technique


This is the first of many dishes and trays I've made with the palm or branch motif.

It's really not nearly as complicated to do as it looks.

This dish was formed by laying a slab over a hump mold and letting the edges at the top and bottom remain just as formed. I trimmed the sides with a fetling knife, though.

After bisquing and waxing the bottom, I dipped the whole thing into a semi-matt white glaze. Taking a fine brush and liquid wax resist, I painted the negative spaces I imagined between a palm frond. (The white areas.)

Of course, you wouldn't have a white spine on a frond, but I decided that is artistic license.

After the wax sat, I poured weathered bronze glaze in the inside, starting at one end of the dish and, tipping and rolling it gently, covered the areas I wanted green and poured the glaze out the other end of the dish back into the glaze bucket. This glaze had a nice brown residue that showed up in the firing.

Every dish I've made in this way has sold. It's a real winner. I want to try it again and again in different combinations--one brown and a tomato red combination worked really well. And the addition of another glaze, probably applied using a brush, would be an interesting evolution to the design.

P.S. We are still involved with working on houses. We are now in our winter house, which was flooded out and we have been reconstructing it for the last 6 months as well as renovating the kitchen in Washington State.

I'm itching to get back into the studio and back to claywork!


Thursday, November 24, 2011

Combining Fibers with Clay


This little pot has a kimihimo necklace.

Kumihimo is the Japanese art of braiding. Toggle cords for netsuke or decorative cords for kimono incorporates kumihimo.

A friend gave me this little cord and it seems to fit nicely on the sauce bottle. Unfortunately, the bottle is no more, due to an encounter with a tile floor.

But the idea still lives and I'm thinking of doing some more of these kinds of pairings.

Friday, November 11, 2011

What happened to the old Porch?


The kitchen had a dutch door that led onto a small porch. The porch was charming with three old narrow windows and shelves, but when you went out of it, you were turned away from the water side of the house. If you wanted to go out on the deck or toward the shore, you had to turn around and retrace the path you took out the door.

We had already covered up the old concrete steps that led down to the yard many years ago when we built the side deck onto the house.

So, with the new door now going out of the kitchen from the other end of the room, the old door was taken off, the porch walled in to create a small walk-in pantry/storage room with large, deep shelves and a niche for my vacuum and a hose bracket, all to one side.

At first, I put all my appliances on the shelves just to see which ones I used the most. Those would finally sit out on the counters in the kitchen proper. Most of the canned goods and the recycle went into the pull-out pantry cabnitry and the rest of the pantry is devoted to bulk storage-type goods.

I really don't miss the side door; the new one is much more practical. The dog, however, still holds out hope that the wall will open up to let him out.


Wednesday, November 9, 2011

The Befores and Afters

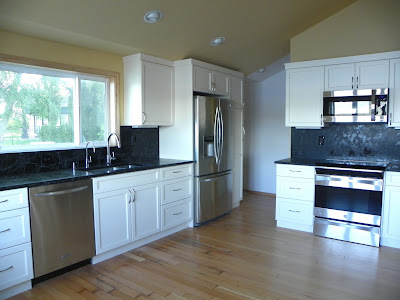
The kitchen is nearly finished.

Even though nothing was changed in regard to expanding walls and the enclosure of a porch to make a pantry, the whole room seems twice as large. Moving and enlarging one window, the addition of a glass paneled door and opening up the ceiling changed everything.

The only thing left to add is a movable kitchen island. I'm ping-ponging between a wooden cart type one and an industrial-look stainless steel.

So, you've already seen the business end of the kitchen--the working area was shifted away from the front and side view area. The previous work plan had me running up and down the long cabinet line. The new work area is now a rather tight triangle from the sink to the stove to the refrigerator at the back of the room.

The new pantry is around the corner where the refrigerator is now located.


The window over the sink was shifted a couple of feet toward the view and is a bit larger than the old one.

The old overhead cabinet and Norwegian "cooler" were done away with and a new door with a very large glass panel opens up the view down the shoreline.

The old kitchen had old strip light cans and another light fixture at the stove. New recessed LED light cans were installed in the ceiling and under the counter LEDs light up the work areas.


The cabinets are lacquer finish ivory white, the countertops and backsplash are soapstone. All the outlets over the cabinets are framed in black so they seem to disappear into the stone.
The old view to the east and the new one with the shortened cabinet and new door. We also placed a smaller table with some English elm chairs at the window.


There was not question that I wanted a solid surface behind the stove and work areas. None of that fiddly postage stamp tile for me! What are they thinking? Imagine what a cleaning nightmare they must be. I hope that fad dies a fast and hideous death!


Besides, when you buy stone, you get it by the slab, so why not use it all? (More about stone countertops in a later post.)

We relocated and widened the narrow doorway. So, even though the kitchen is still a separate room, it seems to link with the living room better.

The wider doorway has brightened and opened up that end of the living room as well as the kitchen.

The old cabinets were replaced with two tall Restoration Hardware French door cabinets. They are oak and have wonderful hardware.

They hold as much or more than the old cabinets. The cabinets were 1 3/4 inches too tall, so the wonderful carpenters trimmed up the bases and they just fit under the curve of the ceiling.

Both cabinets are fastened to the wall and added quarter round anchoring strips finish the bases off nicely. I mixed up some acrylic paint and matched the cabinet finish adding a thin black line between the wood and the flooring.


Tuesday, November 1, 2011

Woo Hoo!

Just got word I'll be included in the exhibit, Here and There: Contemporary Nordic-American Ceramics at the Nordic Heritage Museum in Seattle.

The show will be mounted in conjunction with the National Council for Education in the Ceramic Arts, NCECA for short, to be held from March 28 to 1 April in Seattle next year.

The pieces selected are:

Weathered Bronze Jar, Blue Pitcher and Graceful, a white bowl with applied black decoration.

As the Brits say, "I'm really chuffed!"


Monday, October 31, 2011

Finally!


The workmen have left.

Only a few things remain to be done to make my new kitchen complete: The addition of a stainless steel work table and finishing off the pull-out pantry shelves, adding the soft close to the cabinet doors and a small piece of metal to conceal water pipes going to the new baseboard heater.

My new kitchen is such a joy to work in. It is so much more efficient than the old one and I haven't even filled up all the new storage that was gained.

I'm waiting to photograph it in total with comparative before and afters, but for now, here's a hint:

Shown is the old kitchen with the low ceiling and the parquet floor. The only thing we kept was the 'fridge. The new kitchen has a lofty ceiling and a refinished original floor we found hiding underneath the parquet and an old linoleum floor.

Tuesday, October 25, 2011

Here Today


This weekend I happened to look out the office window and saw this.

What a great inspiration for a drawing, watercolor or a cuerda seca glaze treatment.

Of course, the wind blew last night and today, it's all gone. Glad I had the camera handy.

Monday, October 17, 2011

Yesterday, My Muse Ran Away*

*My title.


Beautiful works by anka-zhuravleva at anka zhuravleva.com.


Tuesday, October 11, 2011

Tea for One


I ran across this great teapot, cup, creamer and sugar listed in the FDIM Museum (Fashion Institute of Design & Merchandising in L. A.) gift shop. https://thefidmmuseumstore.org/

Great arrangement of sugar (on top), creamer, mug and tea/coffee pot.

A real challenge to get all the diameters made so the entire piece interlocks!

The rest of the items are worth a peruse too.

Friday, September 23, 2011

Whew!


This reminds me of what I did once going up the stairs and holding a pot with both hands.
I missed the step,I crashed into the wall putting a divot in it, bumped my knee and elbow, but by golly, I saved the pot!