Showing posts with label Clay Engineering. Show all posts

Monday, June 15, 2015

Pitchers


In this blog, I have shown pitcher forms before, but have not gone into detail about how they are made or how the form has evolved during the making.

This is a very small free form hand pitcher made from a slab with impressed design using a swizzle stick, a sea shell, and a bit of styrofoam packing material.

To make the pitcher, I cut out a bottom freehand in an oval-ish shape, then curved the body of the pitcher slab around the edge of the bottom to fit. I used the clay worm method to seal the sides and bottom together, closing the form with one seam at the front where the spout will go.

I cut a V shape in the front to fit the small hand-formed spout. I left evidence of the cut. I liked that and made a note in my mind to repeat it.

The glaze is celadon and the body is porcelain.

This is a later version of a more distinct surface treatment. This time I added two new patterns; a combed effect. The checked texture is from a scrap of plastic that I picked up in a parking lot. Must have been a part of a tail light….

The basic construction is the same as the hand pitcher shown above, but the body shape was drawn out on a piece of paper before assembly.

There is only one seam in this pitcher also under the spout. This is the beginning of new thinking about spout shapes.

During assembly, I decided there was too much stress on the dip area between the spout section and the back section, so I added a reinforcement 'button' to keep it from splitting. It makes a nice transition element in the design.

The hand fits nicely around the back of this pitcher with the curve resting easily on the hand between the thumb and fingers.

The body is porcelain and the glaze is a semi transparent rutile.

This little guy is also small. It is one of my first tries at hand formed pitchers. Unfortunately, (or fortunately) I sold it. But at least I did have the gumption to photograph it.

In this case, I made the seam down the side instead of under the spout and cut a hole for the spout.

The same technique of cutting out the base first, then forming the body from one slab piece was followed and the spout is also hand-formed.

I pooched out the bottom a bit to give it weight.

This piece served as a glaze test as well. I liked the texture of the slab roller matt showing under the glaze. I named this piece "Black Nose" in my mind.


Another look at an earlier slabbed approach. Basically taking the same form and making two vessels into a creamer and sugar.

The forms are a bit more free and I was playing around more with altering the body and adding feet made of rolled clay.

It is also a glaze experiment using a white body and drizzling a dark brown glaze over edges of the form.


This is a medium sized pitcher and a very early piece. My main experiment was working with the relationship of the handle and the spout.

I wanted them to be the same size and I used the same trusty texture-making tools here. But the difference is the weight and thickness of the glaze. So the pattern comes off a bit more muted.

And the handle is the beginning of thoughts about using rolled clay and the attachment process for a vessel.


This is a larger pitcher form, but here in the the watering can version. I am still experimenting with the spout and handle idea and also using texture on the exterior.

The thicker glaze mutes the surface more than I wanted, but the ideas of spout and handle are still being explored.

This piece is also in porcelain and the glaze is a version of weathered bronze.

The seam is still at the front of the piece and the spout is cut in and attached.


A new approach; using a thrown form and keeping the handle/spout forms only refining them. This time I'm cutting both the places where the handle attaches to the top rim as well as where the spout attaches.

I again used the reinforcing 'button' at the split for the top of the handle.  The spout is laid into the front split and blended into the body of the pitcher.

The new spout form is an imitation of a tropical leaf form; designed to shed water. It works very well.

I love the break in the glaze. It is Coyote Crocodile glaze fired at cone 5 OX. This is a slightly larger pitcher and it's a keeper.


The next pitcher is the same technique and form, but what a difference a glaze makes!

A slight modification to the form is the elevation of the base with the use of a bevel tool at the end of throwing. It improves the overall look of the piece, I think.

The clay is porcelain and the glaze is three different shinos.

This is one of my favorite pitchers.


Thursday, December 11, 2014

Dippers, Scoops and Ladles--Spoons Part VII


We all know what a scoop looks like.

Generic, plastic, universal.

But a Clay scoop has soul.  Note:  The third of this grouping may have been made from a gourd or carved from wood, but it doesn't matter. The form and decoration is why it was included.


The difference between a dipper and a ladle or a scoop is hardly discernible and the shape is almost identical. Perhaps, a ladle has a bit more tilt to the bowl.

Doesn't the one on the great striped fabric look like you could just pick it up and use it right away?


This nest of dippers or scoops could even be soup bowls, depending on their size.


And the same goes for this group. They could be from measuring spoon size to cups. (My measuring spoons are in a drawer; my measuring cups are in canisters where they function as scoops. Saves hunting them down.)

The thongs through the handle holes is a good idea. There would all look great hanging up on a bar in the kitchen.  


The holes could make firing a lot easier--string the dippers along a thermal wire on a jewelry firing tree: 


Just use the top bars or string your own wire between two horizontal stacks of kiln posts to whatever height needed.

Or, if the dipper is larger, fire it on a stilt.

These scoops look great hanging up. The same could be made of clay using a slab roller.


Here's some dippers of my own. The bamboo handled one is meant to be used, but the ones with the African porcupine spines would be a bit more tricky to use.

I would recommend it's use as decorative only.......

Monday, November 24, 2014

Even More Spoons, Part IV

There are many approaches to making clay spoons.

You can create molds for multiples of the same and matching shapes or make a series of all the same shape.

Or:

Same bowls, different handles

Same handles, different bowls

Make them all the same with the same glaze.
Aren't these gorgeous? 


Natural clay handles might simplify how to fire them in the kiln--supporting them by laying them across kiln posts, making a clay support or by stilting them. 

Of course, if you plan to attach a handle, firing the bowls of spoons are easier. The could be stood on end with a bead rack or other stilt form, then handle and bowl are glued together. 

Making ceramic bowls and handles that would later be glued together might be another experiment. I don't think I've ever seen that.....


Fitting them with wooden handles like these measuring spoons, or with driftwood handles.

A great website that matches materials to other materials with the right glue can be found at http://www.thistothat.com/. 

If you're in to glue trivia or news, it's also the webpage for you!


Maybe using spoons to test glazes would be an even better than using test tiles. 
I think I've come up with a brilliant idea!!


And, a word of advice, though. If you plan on making a set of spoons or a collection of any kind, be sure to make extras!

There will still be more posts on spoons to come.


Tuesday, November 18, 2014

Spoons, Part III - Ceramic Spoons and Glazes

One idea is to make different shapes; same glaze.  Notice each spoon has a hole in the handle for hanging.  Maybe a composition display in the kitchen?

I like the homey looking blue and cream utility spoons here. Strainers, measurers, dippers, salt spoons, scoops, lots of uses for a well-glazed, washable tool.

Great use of theme and variation. 
Owl spoons. So Picasso-esque.


Embossing with stamps makes interesting, if maybe not-so-practical spoon bowls.
Great breaks in the glaze on these spoons.


Spoon or spoon rest? You decide.


Simply charming spoon.  

Do you see the little man?

A child would absolutely love this.

Tuesday, November 11, 2014

Spoons, Part I


I've been thinking a lot about spoons lately.

A spoon is a very personal kind of utensil. It's the first one we master.

Clay does not immediately spring to mind as a medium when one is thinking about making spoons.

Metal and wood are more commonly used, but clay spoons work just as well and sometimes better than some materials. Clay won't heat up, for instance.

And while metal and wood have their own strengths and therefore their own design requirements, people who know and understand clay could design beautiful and effective spoons with certain  parameters and restrictions in mind.

Besides, spoons present unique design possibilities.

We're all familiar with the Chinese ceramic spoon, which to me has always seemed a bit difficult to use. I've always thought they would work much better as a spoon rest.

A quick Google image  search with of "Ceramic Spoons" delivers a huge amount of examples.

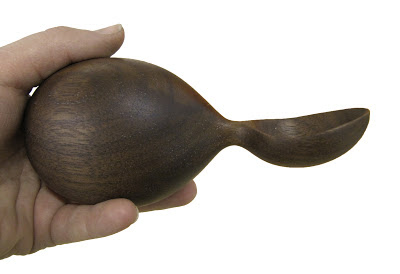
There are lots of wooden spoon forms that could easily be translated into a clay design, although the handles would have to be heavier and thicker:


What a difference dark and light make.

This is a good form. The base of the bowl and handle join gives lots of support.
Interesting Bowls. This spoon has two bowls and might work well in clay.


Some have interesting handles:


This handle design allows the spoon to balance on the rim of a pot. 


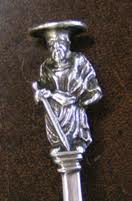
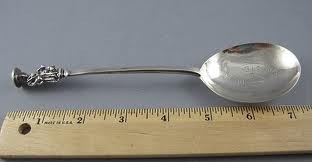
Some have unique handles.  Like Apostle spoons.

And an antique spoon from New Guinea.

This wouldn't work with ceramic unless the bowl alone was made of clay, but it's a beautiful combination.


I love the idea of making salad spoons--Short thick sturdy handles and large bowls together.

How often do you see the two coordinated?


Next: Metal Spoons and Ceramic Ones.