Showing posts with label surface treatment. Show all posts

Monday, June 15, 2015

Pitchers


In this blog, I have shown pitcher forms before, but have not gone into detail about how they are made or how the form has evolved during the making.

This is a very small free form hand pitcher made from a slab with impressed design using a swizzle stick, a sea shell, and a bit of styrofoam packing material.

To make the pitcher, I cut out a bottom freehand in an oval-ish shape, then curved the body of the pitcher slab around the edge of the bottom to fit. I used the clay worm method to seal the sides and bottom together, closing the form with one seam at the front where the spout will go.

I cut a V shape in the front to fit the small hand-formed spout. I left evidence of the cut. I liked that and made a note in my mind to repeat it.

The glaze is celadon and the body is porcelain.

This is a later version of a more distinct surface treatment. This time I added two new patterns; a combed effect. The checked texture is from a scrap of plastic that I picked up in a parking lot. Must have been a part of a tail light….

The basic construction is the same as the hand pitcher shown above, but the body shape was drawn out on a piece of paper before assembly.

There is only one seam in this pitcher also under the spout. This is the beginning of new thinking about spout shapes.

During assembly, I decided there was too much stress on the dip area between the spout section and the back section, so I added a reinforcement 'button' to keep it from splitting. It makes a nice transition element in the design.

The hand fits nicely around the back of this pitcher with the curve resting easily on the hand between the thumb and fingers.

The body is porcelain and the glaze is a semi transparent rutile.

This little guy is also small. It is one of my first tries at hand formed pitchers. Unfortunately, (or fortunately) I sold it. But at least I did have the gumption to photograph it.

In this case, I made the seam down the side instead of under the spout and cut a hole for the spout.

The same technique of cutting out the base first, then forming the body from one slab piece was followed and the spout is also hand-formed.

I pooched out the bottom a bit to give it weight.

This piece served as a glaze test as well. I liked the texture of the slab roller matt showing under the glaze. I named this piece "Black Nose" in my mind.


Another look at an earlier slabbed approach. Basically taking the same form and making two vessels into a creamer and sugar.

The forms are a bit more free and I was playing around more with altering the body and adding feet made of rolled clay.

It is also a glaze experiment using a white body and drizzling a dark brown glaze over edges of the form.


This is a medium sized pitcher and a very early piece. My main experiment was working with the relationship of the handle and the spout.

I wanted them to be the same size and I used the same trusty texture-making tools here. But the difference is the weight and thickness of the glaze. So the pattern comes off a bit more muted.

And the handle is the beginning of thoughts about using rolled clay and the attachment process for a vessel.


This is a larger pitcher form, but here in the the watering can version. I am still experimenting with the spout and handle idea and also using texture on the exterior.

The thicker glaze mutes the surface more than I wanted, but the ideas of spout and handle are still being explored.

This piece is also in porcelain and the glaze is a version of weathered bronze.

The seam is still at the front of the piece and the spout is cut in and attached.


A new approach; using a thrown form and keeping the handle/spout forms only refining them. This time I'm cutting both the places where the handle attaches to the top rim as well as where the spout attaches.

I again used the reinforcing 'button' at the split for the top of the handle.  The spout is laid into the front split and blended into the body of the pitcher.

The new spout form is an imitation of a tropical leaf form; designed to shed water. It works very well.

I love the break in the glaze. It is Coyote Crocodile glaze fired at cone 5 OX. This is a slightly larger pitcher and it's a keeper.


The next pitcher is the same technique and form, but what a difference a glaze makes!

A slight modification to the form is the elevation of the base with the use of a bevel tool at the end of throwing. It improves the overall look of the piece, I think.

The clay is porcelain and the glaze is three different shinos.

This is one of my favorite pitchers.


Saturday, November 29, 2014

Spoons - Form and Decoration, Part V

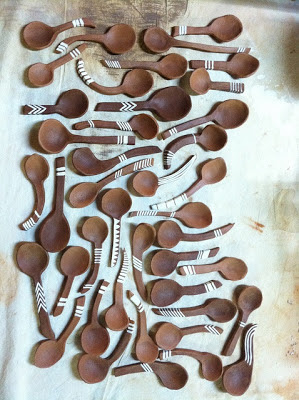
It could be argued that all spoons made by hand fall into the category as an art form, as these beautifully graceful salad spoons demonstrate.


These natural clay spoons, when assembled into a display, become an exercise in pattern and form. Yet you could pluck any one out of the arrangement and use it.
No problem firing these!


I'm not sure what the material is used here, but this decoration is a great inspiration that transforms these spoons or dippers into art. Equally functional and artful.


This grouping with similar roundness of spoon bowls, yet varying sizes, similarity in handles, yet variations also in length and thickness still function as a grouping.


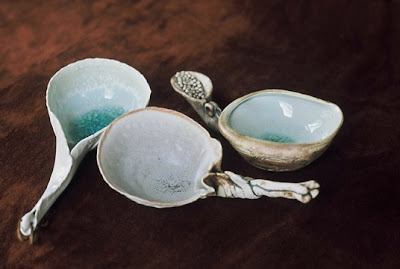
And these seem so organic, they could have been picked up on the seashore.  Great interpretation and glaze.

Different handle length and uniformity in similar bowl size create a grouping, yet they all become very individual because of the free expression in decoration.

I like the onion-like lines on the spoon to the far right.  Look at the negative space created by the length of white left on each handle.

With the two strong forms of the linear handle and the roundness of the bowl, there are two opportunities for endless decorations.


A slight segway here--

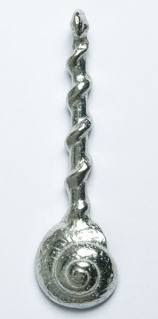
I have a 'thing' for shells. So, of course, I love these two examples of silver spoons with a shell motif.


Sunday, September 30, 2012

Theme and Variation

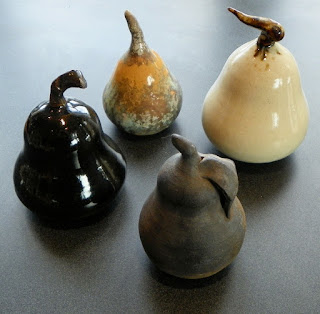
It's amazing how a surface can make the same thing look so different.


These pears were made to be purely decorative. 

Sometimes, I make these to use as salt and peppers. (However, salt and peppers have a totally  different interior construction.)


The white pear glaze is just pure white with an iron-based stem glaze that was encouraged to run.

The matt black was a smoke fired piece which feels wonderful in your hand.

And the shiny black was a glaze test for this delightful glaze.

The smallest pear is a multiple finish:  A basic white with a pumpkin glaze and touches of turquoise glaze. An oxide was applied and then an adhesive for random additions of gold foil.  (Sometimes it's good to go 'way out on a limb.)

It garnered a prize in a Seattle show.


I like pears so much, I even make velvet pincushions. 


Monday, September 17, 2012

Funny Little Pot


So here's a variation on two themes:  Surface treatment and the handbuilt pot.

I used a sea shell, a shred of some kind of plastic car-light part picked up in a parking lot, a wooden stamp, a piece of styrofoam packing and the end of a dowel.


The handbuilding was intentionally un-square.

It was okay to overlap the celadon glaze.


I have no idea what it could be used for.  But that's for the buyer to figure out.

Sunday, April 22, 2012

Lids and More Lids

When I make something like a covered jar or teapot, I always make two lids at least. Usually in two different styles.
Sometimes a pot can be spoiled by a lid failure--it warps, the glaze doesn't work, the lid gets dropped, etc.

By making two lids in the first place, there is always got another one to fall back on.

So, after a while, I have a lot of different kinds of lids. And most of them are just about the same sizes too.

I tend to make 3 to 4 inch openings on teapots. So after looking at the lids today, I am thinking if I made uniform openings, I would have a lot more interchangeable lids.

Take the the short teapot in the picture, for instance.  This time I made only one lid. And I wasn't all that happy with it.


While checking out my lid stash, I found one I like a lot better. It's a little loose, so I'm thinking when the pot is glazed and fired, the alternate lid should fit well. I'll have to fire it on a stilt since it has glaze already.

The glaze is an iron glaze. I had planned to make this pot totally black.

But, I like the lid so much, I think I'll tweek the whole glaze plan and lay down some subtle layers of iron first, then glaze with black. I'll put another layer of black glaze on the lid.

It should be interesting....

Thursday, March 1, 2012

5000 Year Old Pottery


I monitor a website that has a daily round-up of archeological news.

This article caught my interest because of the location of the site and the long history of digs that have gone on there.

http://www.tehrantimes.com/highlights/95935-shahr-e-sukhteh-unearthing-the-5000-year-old-city

The "Burnt City" was a place crossroad of cultures and trade and the habitat of artists of many disciplines.

The pottery is as fresh and beautiful as work done today and has been amazingly undisturbed due to the location of the dig is now a far more harsh environment


Who knew dice were this old?

Sunday, September 4, 2011

Veggie Porcelain


Just playing around with left over pieces of clay, I made these little pill/needles cases that can double as Christmas tree ornaments.

It's fun to try new ideas like this.


Each piece is about 2 inches long: A bunch of celery, carrots and beets and a single asparagus spear.

They are hand molded, hollowed out and a tiny cork is glued in to make a stopper.

They are glazed with a clear glaze and an application or layers of liquid stain thinned with water to make the finish look like watercolor.

I worked from light to dark, layering color over the last after it dried. I couldn't get a vivid red for the beets, so I used fingernail polish just as you would use a lacquer--after all, that's really what it is.

Maybe I should think of making fruit and vegetable whistles?

Monday, August 22, 2011

Inspiration


I ran across this on the web the other day.

It really hit my eye.

At first glance, I thought, "Round picture frame."

It is not that, but my mind went spinning into design mode and I saw this wonderful charger with a plain center and a highly decorated curved rim.

It is a form I've done before experimentally, a large plate with a curved down rim. But I have not made one with the plain center and ornate rim.

I'm clipping this as a springboard to tack up on the wall of the studio. A reminder of the next project, perhaps.

Now the full story--

It's an antique silver Japanese incense jar. The first photo was an overhead shot showing the bottom and rim of the piece.


Not a bad form either.

On the whole, Japanese silver is underrated and under priced. Only recently has it come into it's own as valuable pieces.

Same goes for Mexican silver. The quality is high in silver content in both productions, but until the value of silver began to go up, the work had little attention except for affectionados.

Saturday, August 20, 2011

Virtuosity


An artist who paints, makes sculpture, weaves and makes jewelry is confusing to the world of commerce. Even though there are people who do all these things. It almost seems you must have a certain amount of fame before 'permission' to do multi-level work.

Let's face it. Artists are a unique breed. We see things differently. We have a different attitude toward work and our own interpretation of it.

Look at the work of Bennet Bean. Instantly identifiable. Once his work hit the main stream and the gallery world, everybody wants to have one of his sculptured and painted ceramic pieces. Debate raged about how to classify it. Is it sculpture? Is it painting? Is it 'really' pottery? (Who cares?-----me.) It's art. It's beautiful. That's enough for me.

But that's not the end of the story. Did you know he designs Tibetan rugs too? And jewelry? And knives? And he paints? I'm in awe of this man.

Take a look at bennettbean.com.

I have seen some of his knives and they are a thing of absolute and breath-taking beauty.


Tuesday, August 2, 2011

So Simple


How beautiful.

Featured artist at the Museum of Contemporary Art in Portland OR, Jason Russell's work is the essence of distilled form married with beautifully simple design.

His is the kind of work that makes you think, "Wow, I wish I had thought of that."

Definitely reminds me of Danish ceramics.


More on

http://www.designsponge.com/2011/08/jason-russell-ceramics.

and

http://www.jasonrussellceramics.com/gallery.html#

Monday, July 18, 2011

Charmer


Since I can't get to my studio to work, I thought I'd share a few pictures of pots I've grabbed off the web to dream over.*

This little gem comes with not much information. All the information is in what the eye can see.

It's either Japanese or made during the period of high influence from Japan and China. You can guess just by looking at it that it isn't large; it's probably very light in the hand.

It's interesting both in form and decoration. The piece probably was mold-made. It is more than likely porcelain and has an applied lid knob and handle. The triangular shape is unique.

Two things tip you off to know it's made in the East: The side-mount handle and the spout, which hearkens to saki-pot pourers.

Just look at that glaze design! Almost like someone had taken glue and layered the pot with fine brocade. And what a sensitive bounce of bluish white and dark navy. That fine white line all around the rim sets off and calls attention to the triangular shape. A sensitive design element that adds grace to the pot.

How I would love to handle this pot. To turn it over and see what the base looks like, what clay was used, to try pouring out of it. (Although you already know it would do an excellent job with nary a drip.)

What an inspiration to use for shape and decoration.

*If you have a Mac, it's easy to click on a jpeg, drag it to the desktop, let it go. It will sit there waiting to be opened or drug into another folder to be stored for later viewing. I usually re-name the file as a memory aid, or if I know who made the piece, the artist's name.

Monday, May 30, 2011

Being Loose


Sometimes, when it doesn't count, when there's no pressure, when it's "Let's just see what happens"....... wonderful things can happen.

That's just what happened with this little trivet.


I was busy teaching myself how to throw an upside-down trivet.

I made essentially a bowl with an exaggerated bottom that was thicker than usual. I extended bottom rim and brought up the sides and turned the top edge outward, making a convex shape.

I let it sit on the batt until it was dry enough to take off. I turned it over, trimmed the (now) top to recess the surface and create a slightly higher rolled edge.

Then I cut into the sides of the bowl to make 4 feet, rolled worms to support them and let the whole thing dry.


It warped slightly during the bisque firing, but I kept it for a test piece anyway.

I dipped it in white glaze, dipped a big brush into watered down cobalt stain and just let the brush dance. I was thinking Sandy Brown. http://www.sandybrownarts.com/sandybrownarts.htm


During the firing, the stain went nuts. It popped all over the place making a lightly dotted patterns all over the white glaze.


Lessons learned.

Give a piece strong enough legs so it won't warp in the bisque firing.

Don't use straight cobalt stain.

It's possible to throw a trivet upside down with little trimming and alteration.

Big brushes and a fast and loose application makes a piece that comes alive.