
Showing posts with label handles. Show all posts
Showing posts with label handles. Show all posts
Saturday, January 2, 2016
Handles
Handles are an interesting aspect of clay.
 Here's an early experiment with thinking 'way outside the box for a handle which actually acts as a sculptural component.
Monday, June 15, 2015
Pitchers

This is a very small free form hand pitcher made from a slab with impressed design using a swizzle stick, a sea shell, and a bit of styrofoam packing material.
To make the pitcher, I cut out a bottom freehand in an oval-ish shape, then curved the body of the pitcher slab around the edge of the bottom to fit. I used the clay worm method to seal the sides and bottom together, closing the form with one seam at the front where the spout will go.
I cut a V shape in the front to fit the small hand-formed spout. I left evidence of the cut. I liked that and made a note in my mind to repeat it.
The glaze is celadon and the body is porcelain.
 This is a later version of a more distinct surface treatment. This time I added two new patterns; a combed effect. The checked texture is from a scrap of plastic that I picked up in a parking lot. Must have been a part of a tail light….
The basic construction is the same as the hand pitcher shown above, but the body shape was drawn out on a piece of paper before assembly.
There is only one seam in this pitcher also under the spout. This is the beginning of new thinking about spout shapes.
During assembly, I decided there was too much stress on the dip area between the spout section and the back section, so I added a reinforcement 'button' to keep it from splitting. It makes a nice transition element in the design.
The hand fits nicely around the back of this pitcher with the curve resting easily on the hand between the thumb and fingers.
The body is porcelain and the glaze is a semi transparent rutile.

In this case, I made the seam down the side instead of under the spout and cut a hole for the spout.
The same technique of cutting out the base first, then forming the body from one slab piece was followed and the spout is also hand-formed.
I pooched out the bottom a bit to give it weight.
This piece served as a glaze test as well. I liked the texture of the slab roller matt showing under the glaze. I named this piece "Black Nose" in my mind.
 Another look at an earlier slabbed approach. Basically taking the same form and making two vessels into a creamer and sugar.
The forms are a bit more free and I was playing around more with altering the body and adding feet made of rolled clay.
It is also a glaze experiment using a white body and drizzling a dark brown glaze over edges of the form.
This is a medium sized pitcher and a very early piece. My main experiment was working with the relationship of the handle and the spout.
I wanted them to be the same size and I used the same trusty texture-making tools here. But the difference is the weight and thickness of the glaze. So the pattern comes off a bit more muted.
And the handle is the beginning of thoughts about using rolled clay and the attachment process for a vessel.

This is a larger pitcher form, but here in the the watering can version. I am still experimenting with the spout and handle idea and also using texture on the exterior.
The thicker glaze mutes the surface more than I wanted, but the ideas of spout and handle are still being explored.
This piece is also in porcelain and the glaze is a version of weathered bronze.
The seam is still at the front of the piece and the spout is cut in and attached.

A new approach; using a thrown form and keeping the handle/spout forms only refining them. This time I'm cutting both the places where the handle attaches to the top rim as well as where the spout attaches.
I again used the reinforcing 'button' at the split for the top of the handle. The spout is laid into the front split and blended into the body of the pitcher.
The new spout form is an imitation of a tropical leaf form; designed to shed water. It works very well.
I love the break in the glaze. It is Coyote Crocodile glaze fired at cone 5 OX. This is a slightly larger pitcher and it's a keeper.

The next pitcher is the same technique and form, but what a difference a glaze makes!
A slight modification to the form is the elevation of the base with the use of a bevel tool at the end of throwing. It improves the overall look of the piece, I think.
The clay is porcelain and the glaze is three different shinos.
This is one of my favorite pitchers.

Saturday, December 6, 2014
Spoon Design - More on Handles VI

I love these driftwood handles.
Another approach is to emphasize the handle by either carving or stamping it.
Using an embossed piece could work as in these metal backs.

Adding ornamentation to the handles either by carving, molding or stamping can be another approach to decoration.
Repeating an original design with a mold can assure perfect repetition.
Me, I hate repetition, so I would probably make all the handles similarly.
Whether this particular handle would sit comfortably in your hand is another consideration.
Repeating an original design with a mold can assure perfect repetition.
Me, I hate repetition, so I would probably make all the handles similarly.
Whether this particular handle would sit comfortably in your hand is another consideration.
These silver pieces could be copied by hand or made into a mold to emboss the backs or front handles.


This is a novel design. The handle is hollow and used to store salt. Maybe a special holder would keep the spoon upright and the salt in the handle.
Sculpting the handles of these hand formed spoons results in them moving out of the utilitarian range into an art form that borrows on the idea of a spoon.
Retaining the spirit of spoons, but now moving into sculpture, the spoons become a piece of art, as in these rabbit spoons.
Also, grouping them and presenting them collectively as a unit instead of individual pieces changes them into one statement.


Saturday, November 29, 2014
Spoons - Form and Decoration, Part V
It could be argued that all spoons made by hand fall into the category as an art form, as these beautifully graceful salad spoons demonstrate.

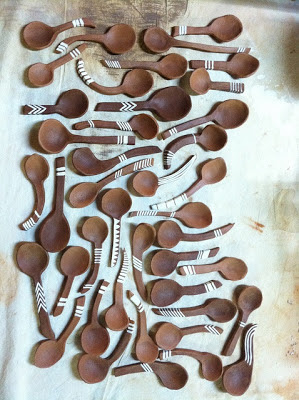
These natural clay spoons, when assembled into a display, become an exercise in pattern and form. Yet you could pluck any one out of the arrangement and use it.
No problem firing these!

I'm not sure what the material is used here, but this decoration is a great inspiration that transforms these spoons or dippers into art. Equally functional and artful.
This grouping with similar roundness of spoon bowls, yet varying sizes, similarity in handles, yet variations also in length and thickness still function as a grouping.
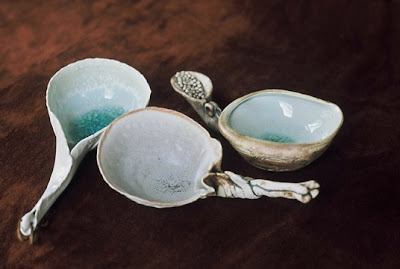
And these seem so organic, they could have been picked up on the seashore. Great interpretation and glaze.
 Different handle length and uniformity in similar bowl size create a grouping, yet they all become very individual because of the free expression in decoration.
I like the onion-like lines on the spoon to the far right. Look at the negative space created by the length of white left on each handle.
With the two strong forms of the linear handle and the roundness of the bowl, there are two opportunities for endless decorations.
A slight segway here--
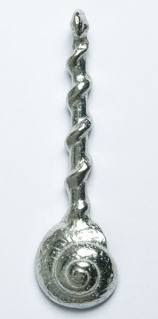
I have a 'thing' for shells. So, of course, I love these two examples of silver spoons with a shell motif.


These natural clay spoons, when assembled into a display, become an exercise in pattern and form. Yet you could pluck any one out of the arrangement and use it.
No problem firing these!

I'm not sure what the material is used here, but this decoration is a great inspiration that transforms these spoons or dippers into art. Equally functional and artful.
This grouping with similar roundness of spoon bowls, yet varying sizes, similarity in handles, yet variations also in length and thickness still function as a grouping.


And these seem so organic, they could have been picked up on the seashore. Great interpretation and glaze.

I like the onion-like lines on the spoon to the far right. Look at the negative space created by the length of white left on each handle.
With the two strong forms of the linear handle and the roundness of the bowl, there are two opportunities for endless decorations.
A slight segway here--
I have a 'thing' for shells. So, of course, I love these two examples of silver spoons with a shell motif.


Monday, November 24, 2014
Even More Spoons, Part IV
There are many approaches to making clay spoons.

 Make them all the same with the same glaze.


You can create molds for multiples of the same and matching shapes or make a series of all the same shape.
Or:
Same bowls, different handles
Same handles, different bowls
Or:
Same bowls, different handles
Same handles, different bowls

 Make them all the same with the same glaze.
Aren't these gorgeous?

Natural clay handles might simplify how to fire them in the kiln--supporting them by laying them across kiln posts, making a clay support or by stilting them.

Of course, if you plan to attach a handle, firing the bowls of spoons are easier. The could be stood on end with a bead rack or other stilt form, then handle and bowl are glued together.
Making ceramic bowls and handles that would later be glued together might be another experiment. I don't think I've ever seen that.....

Fitting them with wooden handles like these measuring spoons, or with driftwood handles.

A great website that matches materials to other materials with the right glue can be found at http://www.thistothat.com/.
If you're in to glue trivia or news, it's also the webpage for you!

Maybe using spoons to test glazes would be an even better than using test tiles.
I think I've come up with a brilliant idea!!
And, a word of advice, though. If you plan on making a set of spoons or a collection of any kind, be sure to make extras!
There will still be more posts on spoons to come.
Tuesday, November 18, 2014
Spoons, Part III - Ceramic Spoons and Glazes
One idea is to make different shapes; same glaze. Notice each spoon has a hole in the handle for hanging. Maybe a composition display in the kitchen?


I like the homey looking blue and cream utility spoons here. Strainers, measurers, dippers, salt spoons, scoops, lots of uses for a well-glazed, washable tool.
Great use of theme and variation.
Great use of theme and variation.
Owl spoons. So Picasso-esque.

Embossing with stamps makes interesting, if maybe not-so-practical spoon bowls.


Spoon or spoon rest? You decide.
 Simply charming spoon.
Do you see the little man?

A child would absolutely love this.
Friday, April 18, 2014
India or China?
 I inherited this unusual vintage pot from my husband's family. I'm guessing from the design, it was made around 1920-30. This pot was made in many different colors and sometimes with an applied gold trim.
The divided pot was so the hostess could offer her guests either tea from or China. Very elegant, yes?
Beside the Twinspout Tea Master make, the Hall Tea company made a lot of teapots that look like this, although they were usually made without two chambers.
The last time I checked, this pot is worth around $200.00 because it is in perfect condition.
There is a kiln mark on the foot, but these are usually overlooked in evaluations. And evaluations vary according to how they are framed. Insurance evals are higher because they refer to replacement values. Auction prices are much lower because they are for a quick sale. The real value is somewhere in between. Also prices will vary according to the way a market swings.


So once the pot is filled with tea, how do you tell which side has which tea?
There are very subtle 'touch and sight' clues that aren't apparent at first sight.
The handle has very slight ridges over one spout. Some other pots have a more obvious 'thumb stop' or knob on one side or the other.

And you can barely see an impressed arrow on the left-hand galley pointing to one chamber. It is the chamber closest to the ridged side of the handle.
 Also, you would think the lid would fit no matter which way you put it on. But it only fits one way. The clue is also a subtle arrow impressed into the claybody.
Next time you see one of these in an antiques store, check it out.
Thursday, February 6, 2014
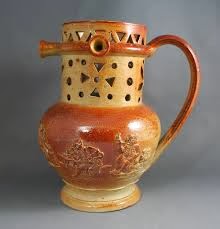
Puzzle Jugs

http://www.dump.com/puzzlejug/
Check out this outstanding video that explains how to make a puzzle jug.
Definitely want to try my hand at this some day.

Saturday, March 30, 2013

I absolutely LOVE this guy's work,
He is a New Zealand potter; lives on the western side of the South Island in Hokitika, a place where New Zealand jade is plentiful and jade galleries abound in town. We marveled at a solid jade breakfast table and a bolder the size of a small settee.
Weaver's main gallery space is a nice showroom at the edge of town. When we arrived, the owner said he had just left. He was one potter I really wanted to meet. I so admire his work. I had intended to buy one of his black teapots, but found a sauce pot I liked even better.
I don't know if he steam bends the wooden components of his pots or if someone else does them, but they always look just right on the piece. I especially like the yardstick handles.


Subscribe to:
Posts (Atom)
