Showing posts with label 2-dimentional work. Show all posts

Wednesday, October 28, 2015

And Now for Something Completely Different

All through my life, I have made drawings. It is the first expression of art for most people. I was lucky enough to have access to miles of big paper due to the fact that my familiy's owning a dry good store and wrapped most things in lovely tan paper reeled off of a big roll stowed under the sales counter.

Never the less, I must admit am AM a paper hoarder. I admit it. And I like nothing better than to use colored pencils or watercolor with a lovely piece of tinted or heavy hunk of paper.

Here's some of my work:

Rhodies
Colored pencil on tan paper


Guam Palm
Watercolor 

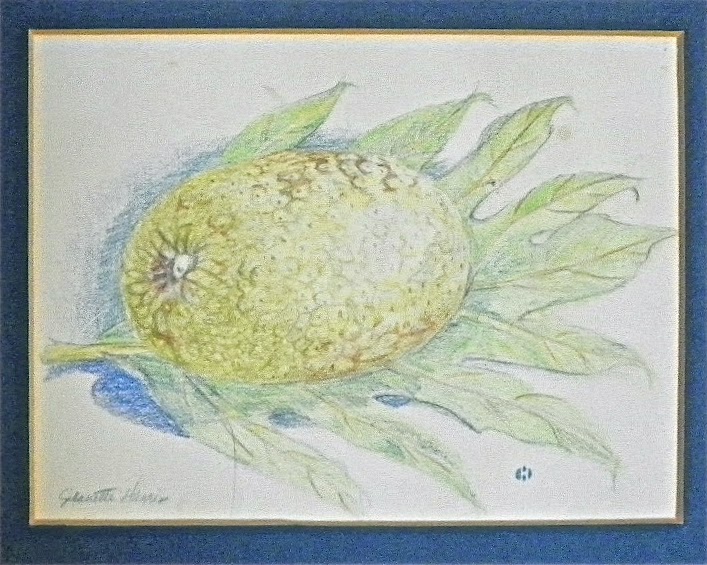
Breadfruit
Colored Pencil


Saturday, October 11, 2014

Playing Around with Design

Even though I don't have a studio right now, I never stop thinking and studying ceramics.

Some time ago, I made small templates of basic forms: Round and square plates. The forms are small enough to dash off a sketch or toy around with a design and variation. I can run off a copy on my printer and expand the idea or upload it into my computer.  

Here's an example:


The first one is a bit busy on the right side. And I would remove the small connecting lines at the bottom of the branch like figures.  

All in all, I think this would make a good wax resist platter. It would be interesting to try this in scraffito too.

   Here's a positive and negative of the same drawing.  (The darker snake is the original drawing.)  Although the snake image is about the same, the second image seems more of a 'fat snake'.


The third variation seems more dynamic just by adding another outline.

A lot of people do not like snakes. I'm not crazy about them, but I find their image fascinating. 

Maybe no one would want to eat an hors d'oeurvres off a plate like this.


Friday, November 30, 2012

Monoprints

Have you ever made a monoprint? They are easy to do and an interesting exercise in drawing.

What you need is an absorbent paper, a pencil, ink and a glass surface.

Brayer out the ink on the glass to a consistent coating. Slightly dampen the paper and lay it over the ink surface making sure there aren't any air bubbles, but do not rub the paper. Tricky, but easy to get the hang thereof.

For these drawings, I used some printing ink from the tail-end of a tube that was going to be thrown out after an art class.  (We will discuss art hoarding at another time. )

After you get the ink-glass-paper setup, begin drawing free hand to the paper surface. Press firmly to make sure the pencil strokes will transfer to the underside of the paper. Light rubbing is now permitted if you think it will add anything to the picture. You will know how this will work after you've done a few drawings.

When you are finished, carefully peel the paper off the ink ground.

Here's two drawings I made from some left-over newsprint, left-over ink and a piece of picture frame glass. (Now I wish I had used better paper, but there it is.)


This drawing shows some light rubbing.


The resultant art work has a very distinctive look and will come out reversed-image. Which may be a surprise to you and may make you correct some drawing idiosyncrasies you may have and didn't know about until then.


This drawing was done years before I lived in Bahrain and actually saw scenes like this. Sights like this was very common and would not depict people who were destitute or empoverished. It could very well be village women in town with items to sell.


Friday, November 23, 2012

Graphics Design - Logos


Well, I've been rather busy. 

We are in our winter location and I've been working on designing the new logo for a Wiki page for CLAYART.   

CLAYART is a worldwide clay artist's and a clay associated discussion email group that has been active for over 15 years. It began as an idea during a yearly National Conference for Education in the Ceramic Arts (NCECA) convention. I will explain NCECA and CLAYART further in future posts. But sufice it to say the internet email part of CLAYART is undergoing big changes at the moment. 

One of the new changes was the creation of a wiki page. My part was to design a tiny, easily-recognizable logo to mark the upper left-hand corner of the site. 

Being completely new to the designing of tiny wikis, I have been on an intense learning curve. 

I don't have sophisticated computer design software, but I have had an undergraduate series of courses in computer design which I took just because they were available to me. And I discovered that through Apple Pages, I can do a limited amount of black and white work. 


Warning:  Some Graphics Geekdom follows--

The catenary arch design was made by stretching a black circle into an oval, then overlaying it with a white oval, adding a thick horizontal line to connect the bottom of the arch and suggest the floor of a kiln. 

I blocked the bottom of the ovals with a lineless rectangle placed below the "bottom of the kiln" line and layered over the top (brought forward) of the oval shapes. That blocked the bottom sections of the ovals from view which is equal to erasing them. 

The teapot was made by manipulating black and white ovals. And the handle to the pot is made the same way by layering a white oval over a black one. 

The body of the pot is another black oval, with another white one imposed to suggest a lid. The lid knob is a standard shape available from the menu and layered over the black and white ovals (brought forward).

The whole design is on top of a black rectangle, which was sent to the back. This creates the top 3 borders of the logo.

The lettering at the bottom was lifted from a tiny graphic I had squirreled away and used on this blog some years ago. 

This is fine for a tiny wiki, but when I wanted to enlarge it to a huge file for use in other ways, that's where the trouble began. All the enlargements resulted in shaggy, pixelated lettering. 

I finally ran the whole thing out of my printer at page-size and, using a fine marking pen, smoothed up the letters one by one. Like, taking-off-your-glasses, sticking-you-nose-to-the-page making-pixels-go-from-squares-to-smooth-edges smoothing. 


More later---


Written later than the above versions.  Sorry for all the changes after the initial posting. On re-reading the first ones, I realized I could write a clearer description of the geek graphics.


Saturday, August 25, 2012

Logo Variation

Now that I have a new logo design and business cards set up, I can morph that into any kind of other card.

By removing the text under the logo, I can add "Thanks" and add an address, phone number, website address; virtually anything then create a new master for duplication.

I like to tape a note card to the bottoms of my bakeware that say things "Place in a cool oven" or "Microwave Safe", "Lead-free glaze" or "Microwave Safe - contains iron glaze; may be warm to the touch." And sometimes, "Not suitable for food".


Wednesday, August 22, 2012

Logo Experiments

I've been trying out some new logo ideas.  I need tags for my pots for an upcoming show and my old tags need to be refreshed, design-wise.

Since I did my last batch, I've changed computers and graphics programs.  What a pain! It required some redesigning to get a design resource sheet like this one done. I can take one of these rows and convert it into multiple repeats as a one-design master sheet. This sheet was done to see how new ideas would work out.

I started off this series by scanning one of the old hangtags and using that image, manipulated it around for a while trying different designs.  When I get something I like, I'll run off a couple of master sheets and put them into a dedicated folder so I can reprint different cards and tags as I need them.

On the sheet above, the first and third rows will probably be used for price tags because they will be printed in large batches and they take less ink to make.

The darker design will be used for more expensive items or for contact info cards, thank yous, or other special printing.

I will take each one of these 4 variations and make a master sheet of each.  That will give me 4 different logos to duplicate.

For a hangtag, I can run off a sheet and punch holes in the top, put in some black embroidery thread for the tie and attach them to the pots. The design must take into account that a hole will be punched in the top, so room has to be left for that. I want to see how the would look on a pot. There's a lot of difference in how they look on a sheet of paper in a row and how they will look individually.

A blaring, dark row will look entirely different as single tags. Likewise, a lighter design might turn out to be wimpy.  We'll see.


I like to use a creamy heavy paper for my printing. With a strong black and white design, you can print the cards off on any color paper.

It gets complicated, but there's lots you can do between a simple graphics program, a scanner and a good printer. Oh, and a big paper-cutter.


Wednesday, August 8, 2012

A Two Dimensional Interlude

Found while sorting visual reference files......

Drawn for the amusement of my children when they were in grade school.....
            Quote by V. Lindsay

Funny, the things you keep.


By the way,

    In real life,
         
          I hate grasshoppers.

Tuesday, July 31, 2012

Clay Picture Frames


Sometimes, I like to combine clay and 2-dimensional work in a different way.

This clay frame was made before the drawing--I think it's easier that way.  It isn't a large frame, only 5" x 6". Another experiment in clay engineering.

I turned the corners up just for fun.

I experimented with a glaze at the same time.

The tree is an imaginary one done in watercolor.

Note:  the seemingly cracked corner is the result of an accidental collision of the frame and a teenager.


You can make a slot for the artwork in the back by applying strips of clay on 3 sides offset around the display window of the frame. Just look at the backs of some of the frames you have around the house and improvise.

This frame has a raised edge on 4 sides. The glass, picture and backing fit into the recess created by the edges, then the backing and the clay are held in place with, in this case, just tape.


Hanging can be solved in many ways also.

This piece hangs from an opening made in the clay at the top. A small nail fits right into the space left under the loop. The piece is quite small and doesn't weight much, so this works well.

You can make an indented hole area on the back of a frame to fit a hanger.

Loop holders for wire strung across the back is another way to solve the hanging problem. A lot of times, I've used fishing line or jewelry wire to hand pictures and claywork. These are strong wires.

A high temp kiln wire can serve as a holding wire. It can be embedded in the clay and fired at the same time in the kiln.

You are only limited by your imagination.


Sunday, July 29, 2012


One of my passions is collecting shells. Even though I don't live in Florida, where I understand people fill garages with them, I have accumulated a good selection.

They are my favorite subject for drawing. Beside that, I have often thought about putting my own  claywork in a drawing.

This is a little bowl that is long gone from my inventory, but at the time, it made a very good background for these small shells referred to as "Blood Mouths" because of their vividly red lips. The drawing is done in colored pencil on a light blue paper.

Blood-mouths* are often mistaken for cone shells, but they are really conch shells, common to Guam, where I collected these and first started diving.

*Strombus luhuanus.   Also known as the Blood-mouth Conch, this sea shell features a dark brown columellar and a reddish inner lip. This animal lives in colonies and is This seashell is common to Western Pacific on sand to 5 fathoms.   Measures approx 1. 5" - 2".  

Wednesday, June 20, 2012

More Computer Graphics

Here's a business logo I designed a few years ago.

I used Superpaint to draw the hen, do the lettering and encircle the design.


So, the placement wasn't good. The hen is looking like she's going out of the frame--too forward. Nice relationship between the curve of the tail feathers and the back of the circle. So, I moved her back and gave her 'beak room.'


I began to play with the image. Putting an apron on the hen.  And what could be more appropriate for a hen than to change the circle to an egg shape?


Maybe the glasses is a bit too much.......

I always liked the story of the Little Red Hen. "I'll do it myself" as in the story was sort of my motto as a child.

 I once read that by knowing people's favorite children's story, you could gain some insight into their psyche. I've pretty well stuck to The Little Red Hen for sure. 

 The title, "The Little Red" Hen may be under copyright, so I probably can's use The Little part. 

Maybe I'll make labels for my elderberry jelly and sell it at the Farmer's Market....... 


Wednesday, June 13, 2012

More drawer rifling. Obviously, I'm on a cleaning jag.


From time to time, I've designed business cards using computer programs.

One beloved program which is sadly no more was SuperPaint, a simple design program that worked on (now) ancient Macintosh. It ceased to exist after 1992.

 I loved it.

 I made this using Super Paint:
And this:


(Yes, I have been in the antique business too. For several years, my husband and I did shows and had spaces in antique malls.)

When a few promo cards for a clay show came back because of a few  bad addresses, I cropped photos and stuck them in an envelope. Later,  I scanned one into my images program.

With a bit of tweeking, it might be handy later on a future card.


Monday, October 17, 2011

Yesterday, My Muse Ran Away*

*My title.


Beautiful works by anka-zhuravleva at anka zhuravleva.com.


Tuesday, November 23, 2010

Doodle to Design

All my school notebooks had doodles down the margins.

It wasn't that I was not paying attention; actually, I could remember what was being said by looking at the doodles.

I took notes too. I don't mean to say the doodles were the ONLY thing I did while in class.

Some doodles grew into pictures or expanded into design.

This little doodle is about 3 times larger than the original. I liked it so much I cut it out and glued it on a larger piece of paper so that I wouldn't loose it.

The first time I used this design was on a large slab of clay rolled out with the intention of cutting it up. But when I looked at the shape, I liked it so much I coaxed it into a large platter, smoothed the edges and fired it. The "Angry Cat" was done over the iron glaze with thinned oxide.

Every time I've used this design, I've sold the piece.

Friday, October 22, 2010

Handmade Books


This post in a slightly different form, also appears on my other blog,
http://fiberneedlethread.blogspot.com/.


I have an old book press like this one and I use it for fall leaves. I love lacy fall leaves; the ones the bugs have eaten holes in. I save the leaves from year to year so I have a good supply for when the spirit moves me.

I also hoard great paper, raffia and beautiful twigs. (Rocks too, but I haven't figured out how to use them yet---maybe a cut-out with a suspended rock.........)

No reason why I couldn't make a small, bas relief, very light-weight decoration from porcelain to use on the cover of a book. I once saw a potter flip a slab of porcelain to paper thinness. I wonder if there are ceramic book covers in existence.

Or maybe make half-round bosses to attach the binding on the outside.

Or create an interesting bookmark to coordinate with the cover piece.......

Making books is another thing I do when I'm at a slump with clay or it's too cold to go out to the studio. You know, when you're 'off' or stumped or just not in the mood.

The cover of these books are from a stash of old photograph mounting albums. I ran across a bunch of these, dismantled them and cut them to fit the pages, another stash of paper from a book publisher. They are off-cuts from a print run.

The second book is made the same way, but I had to figure out how to attach the bare twig to the back.


Breaking News:


I just googled ceramic book covers and found this:


http://www.behance.net/Gallery/Ceramic-Book-Covers/249094

Monday, April 21, 2008

Dragons


I don't have a kiln god--I have a kiln dragon. This fellow hangs on the wall near my kiln. I've had him for years and honestly can't remember when I got him. It must have been when we were stationed in Japan. Somebody must have given him to me, 'cause I wouldn't have bought him......He's made of all sorts of electronic wires and other plastic detritus. (The paper umbrella is my addition after we moved to the Pacific Northwest.)

Recently, I bought a slide converter--one of those great gizmos that converts 35 mm slides into digital files. I'm in the process of taking stacks of old family and art slides to store onto discs both for an art archive and to share the family ones with my children.

In the process, I ran across this old watercolor from many years ago. This was done in an experimental class dealing with creating paintings on very wet paper and manipulating the color runs. The title is "Realm of the Red Dragon".

See the resemblance? Hint: The head of the dragon is in the lower left-hand corner.

Tuesday, April 15, 2008

Playing with Design


I'm fascinated with pattern. The other day, I saw a program about the Aborigines in Western Australia showing some of their work being exhibited in an arts festival. It was very distinctive with more line and pattern than drawings and paintings I had seen before. I found them to be quite beautiful. It was the inspiration for this series of drawings:

Preliminary idea sketches--very quick and spontaneous. Just enough to get an idea down.


Further expansion of the first ideas with more developed thoughts with the inclusion of points in space; exploring the impact of just one more line element. (I really like the top one.)


Almost going over the edge.


Seeing how the design expands and changes with color.


Another variation: Working vertically and expanding an earlier design with limited color, changing the appearance with a deeper color change.And the dimension of the element of points


And a bit more tightly worked horizontal design with the tiles and first lines placed, then a double line and the added element of multi-colored areas. Note that the tiles have now been taken to areas of color of space with the removal of the bottom and top borders of the white line areas.


These ideas could work as well in a large wall painting or in clay. Any one of the individual tiles in any of the drawings could be taken out of the arrangement and used as a great tile design. Or, used together would be wonderful on a large tray or wallpiece.


Sidenote: After I worked on these drawings, I went out onto the patio to read. I looked up from my book and saw this: Who says our environment doesn't have an impact on us?